How to install and configure XAMPP on Windows 10
- How to install XAMPP on windows 10
- How to run XAMPP control panel
- How to configure XAMPP on windows 10
- How to enable Additional PHP extensions in XAMPP
- How to enable 3rd Party PHP extensions in XAMPP
- How to fix Apache not starting on XAMPP
- How to increase PHPMyAdmin / PHP upload size on XAMPP
- How to change PHPMyAdmin password on XAMPP
- How to check which ports are in use using XAMPP
- How to change default ports of Apache and MySQL on XAMPP
- How to access MySQL from command line on XAMPP
How to Install XAMPP on windows 10
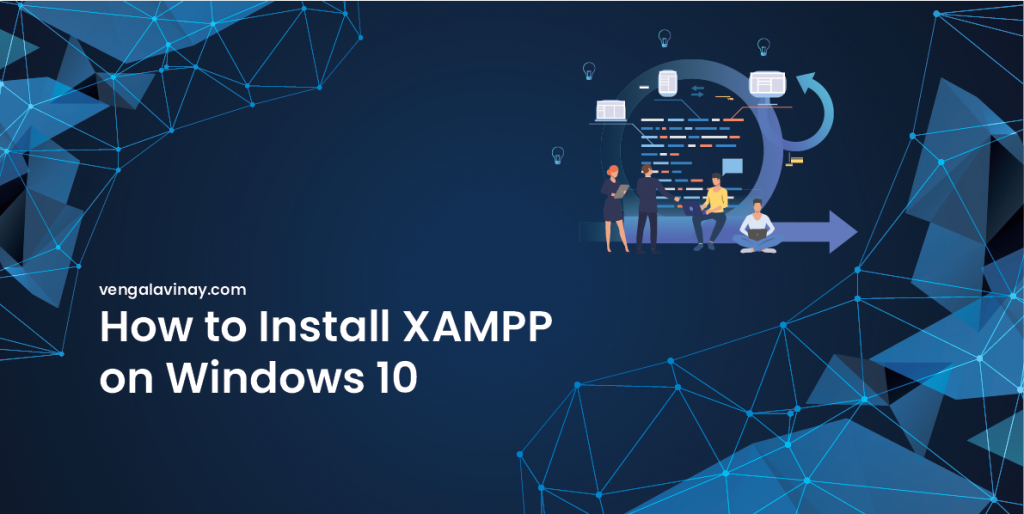
- Download Xampp from apachefriends.org and double click the downloaded file to install
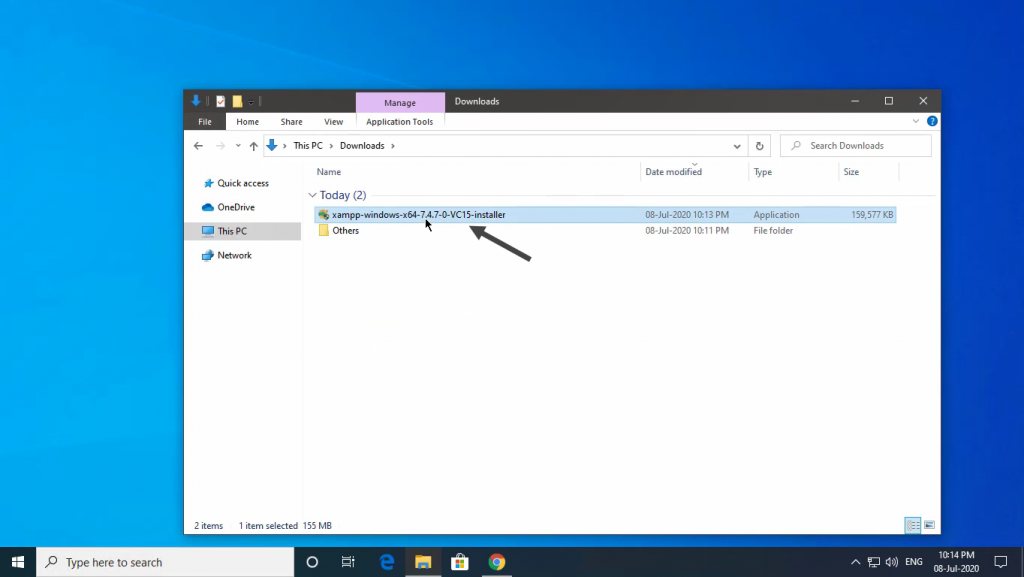
- XAMPP installer file asks for admins permissions.
- Presents Bitnami – Splash Screen
- Primary Installation screen – click next to start the installation process.
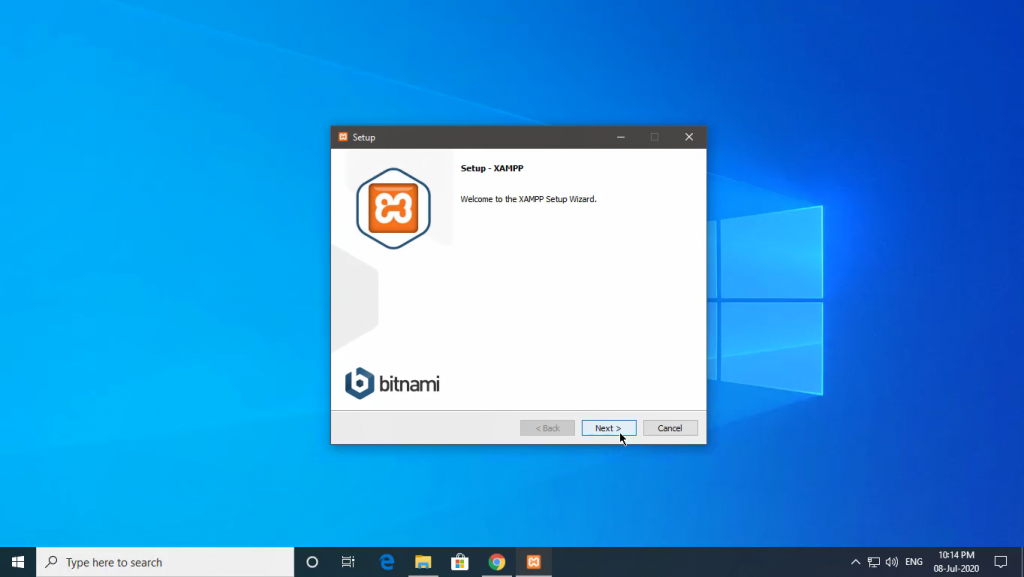
- Select Components/ Softwares/ Scripts to install. Select the mandatory components only. If you need remaining components at any point in time, then you can re-install the components later. For now, we are selecting APACHE, PHP, MYSQL, and PhpMyAdmin and remaining softwares we are unselecting. If you want to install all the services you can install them.
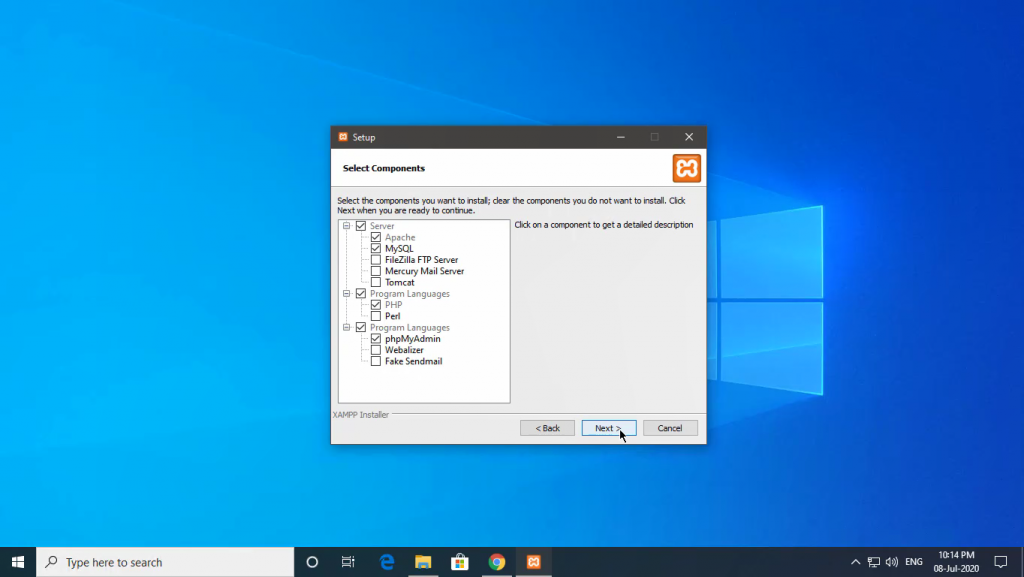
- Select the folder location where you intended to store the files. Some will store the data in C drive. Some want to change the path; in that case, you can utilize browser option.
For now, we are using the default location.
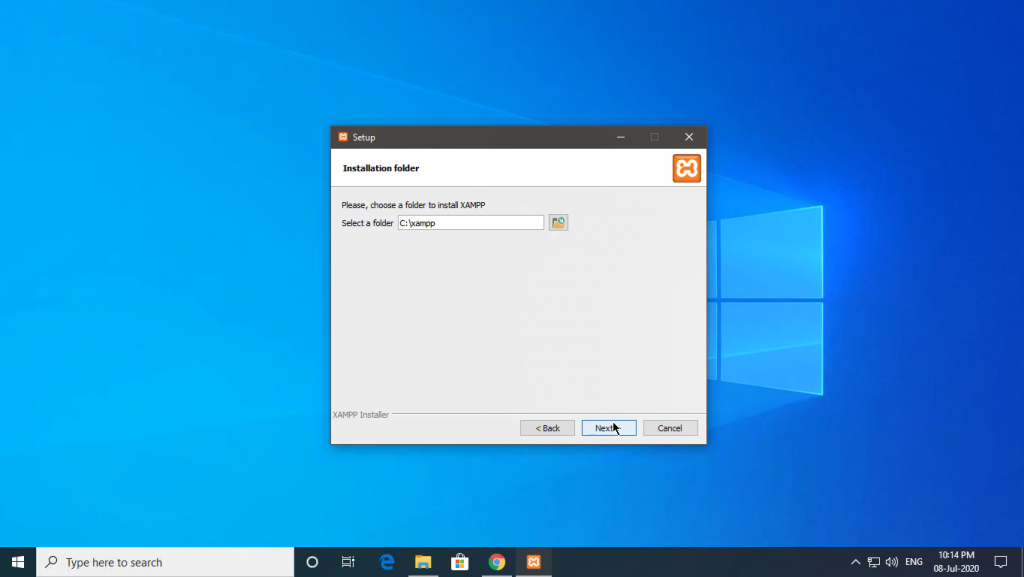
- XAMPP bundle pack supports two languages, English and Deutsch. If the case you want to change the language, you can change the language.
- In the installation process, we will be asking to learn more about bitnami services and products if you are interested go to their website, check the option else uncheck the option.
For now, we are unchecking the option.
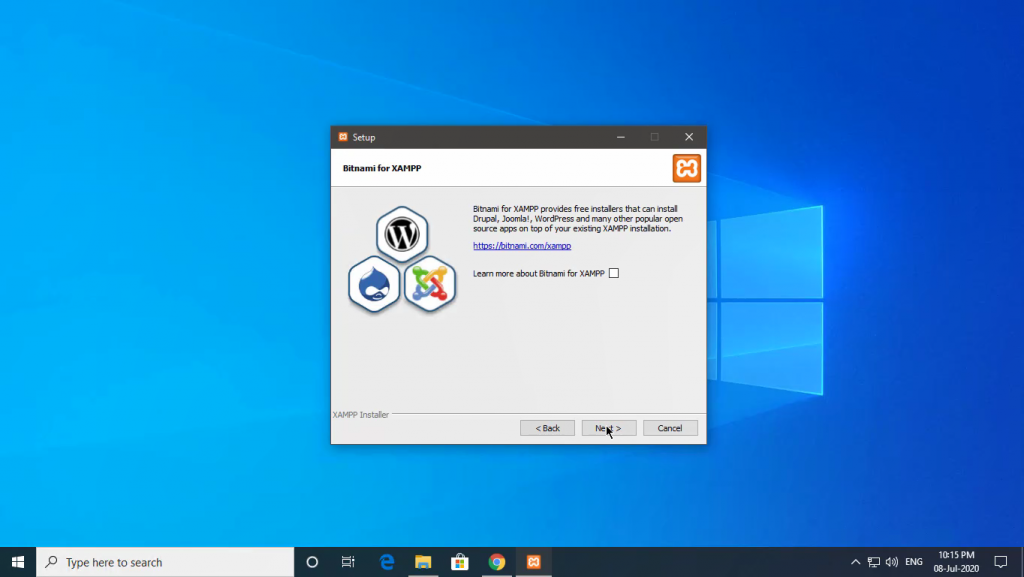
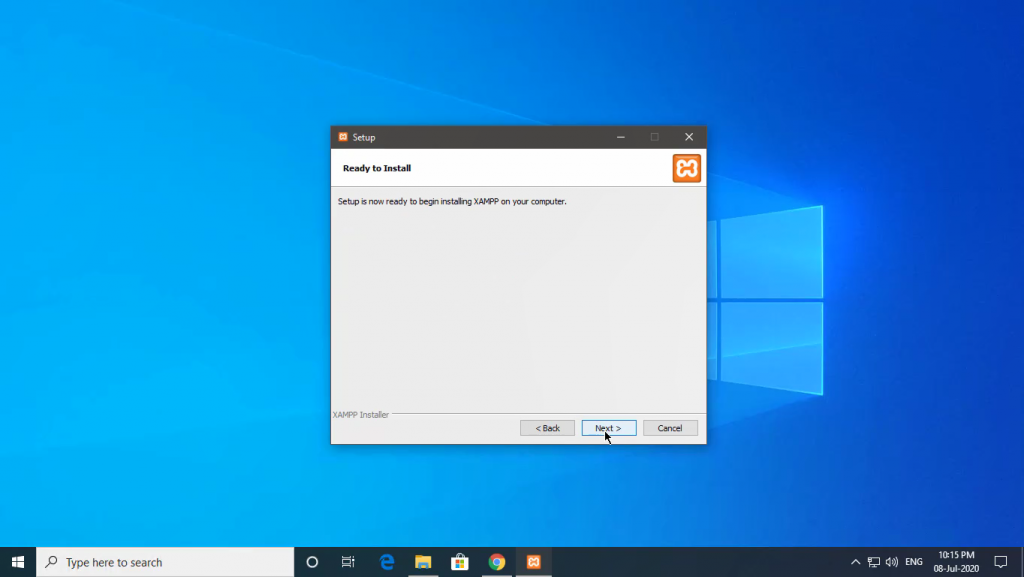
- After selection process, installation page occurs by clicking Next install Xampp.
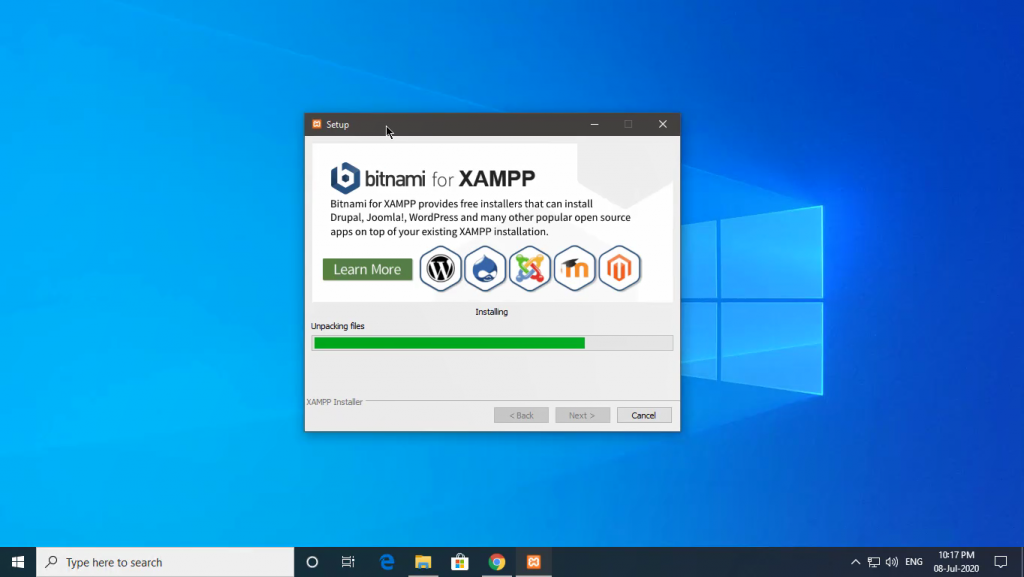
- Unpacking the files and installing the components.
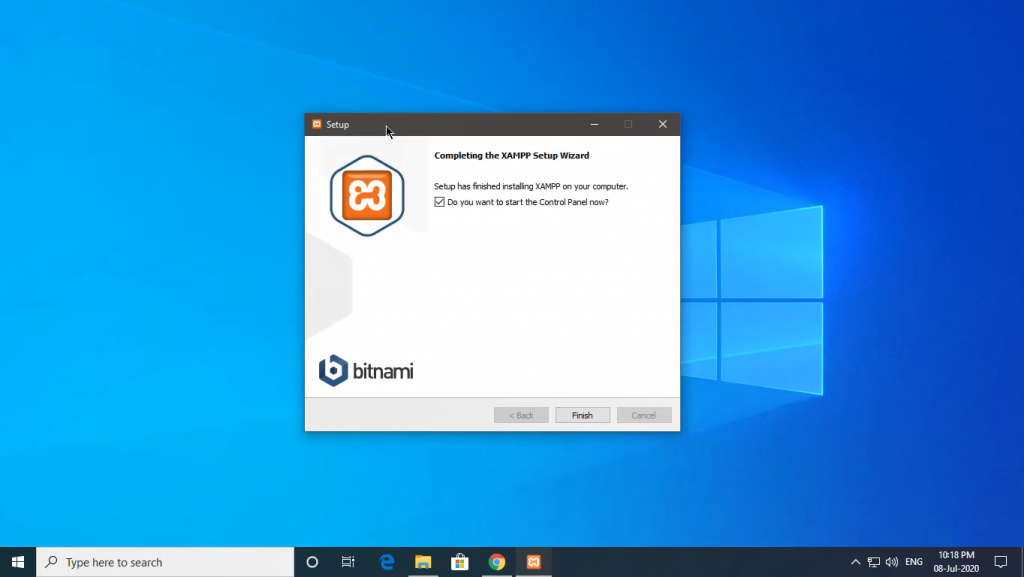
- After installation a complete setup page occurs with an option to open control panel after installation, we can select or unselect as per requirement.
How to run XAMPP control panel on windows 10
We can run the XAMPP control panel in 2 ways
- Process – 1: Search for XAMPP keyword in the windows search box
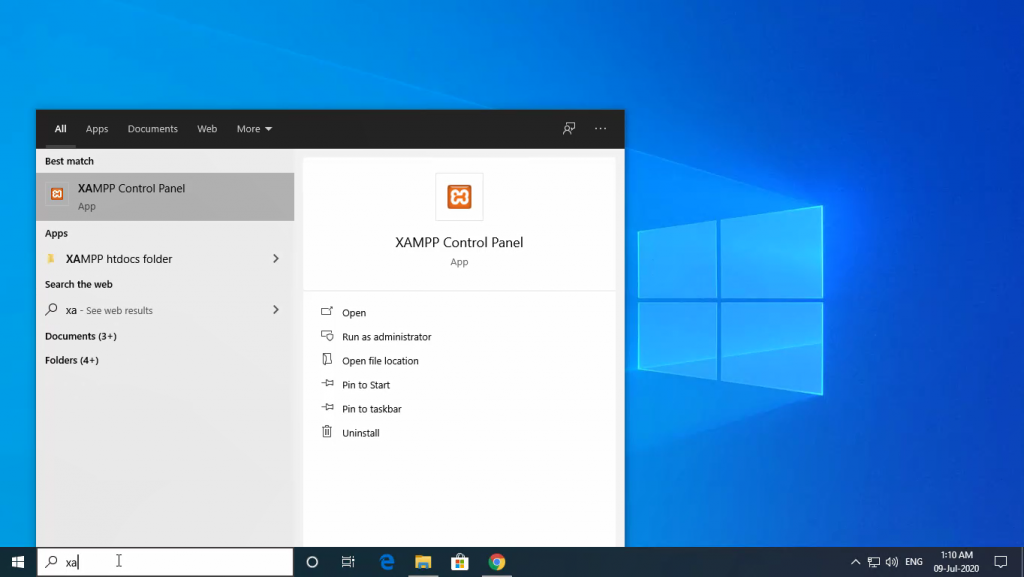
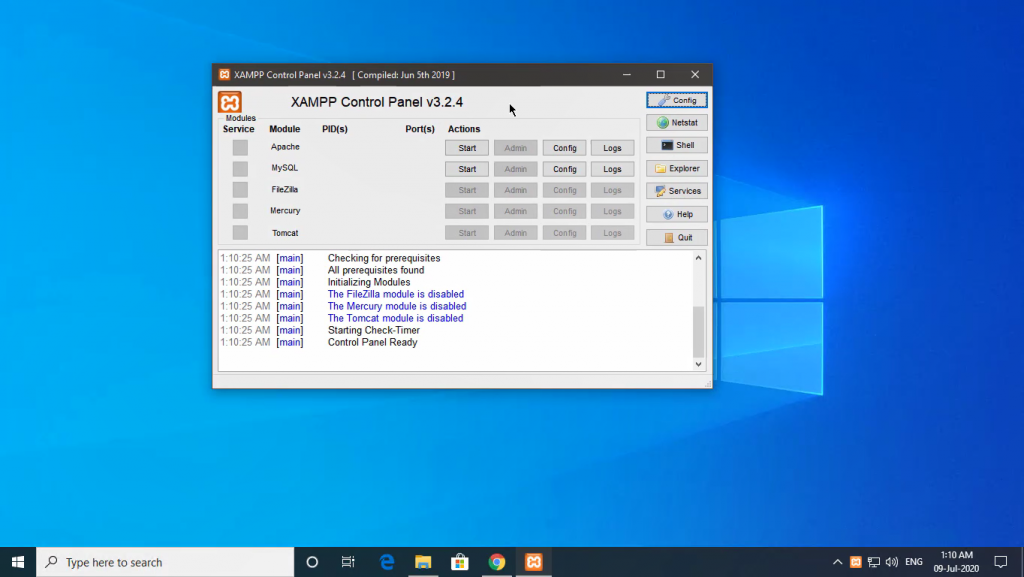
Click the open button, no admin permissions required for this. The XAMPP control panel shows as below.
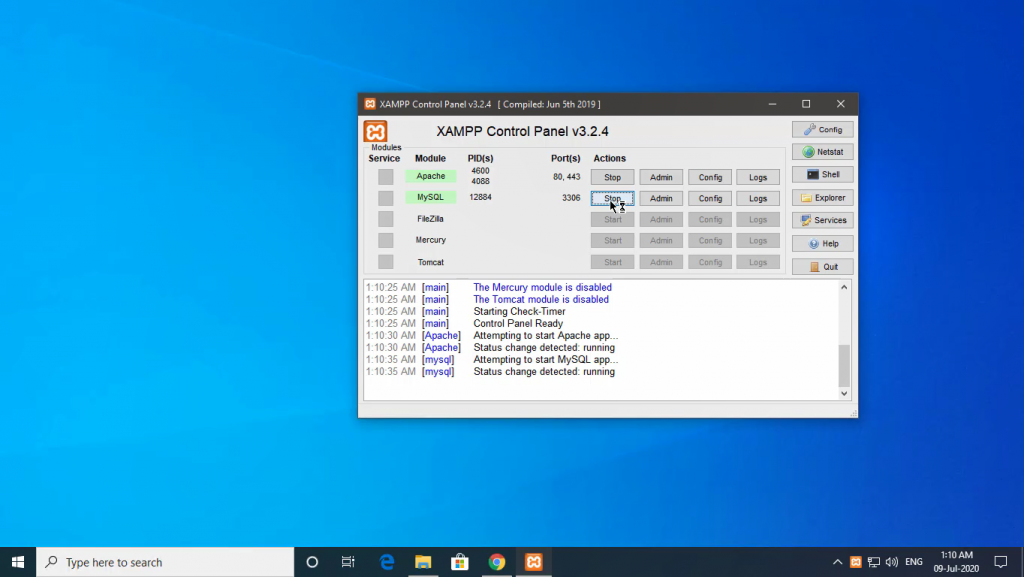
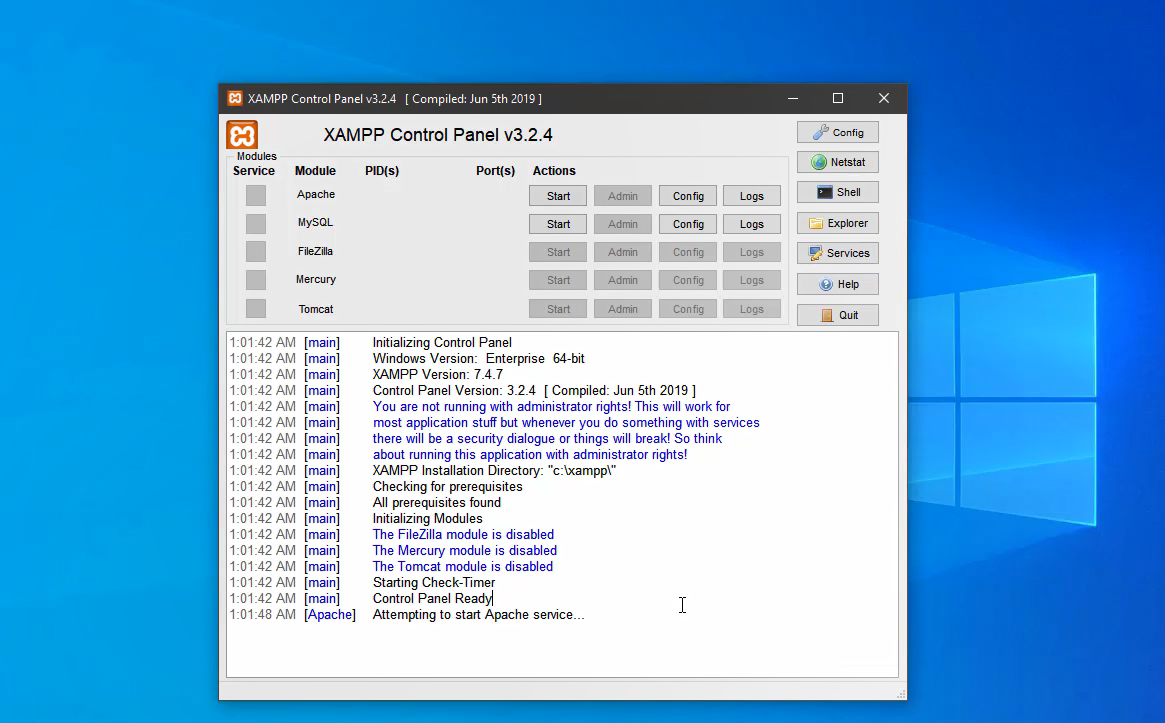
Start Apache and Mysql Softwares by clicking Start. Each program will contain their process id (PID), Apache reserves 80 port, and MySQL reserves 3306 port.
- Process – 2: Manually go to the location where you have installed the software, by default(C Drive). In the xampp root folder you can see xampp-control.exe.
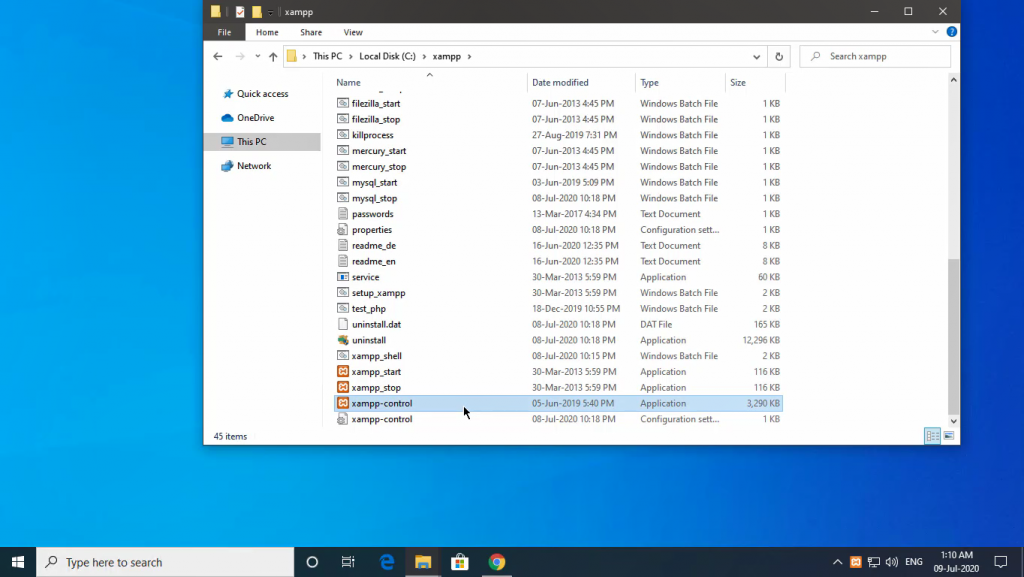
It will open the xampp control panel. It will look like below.
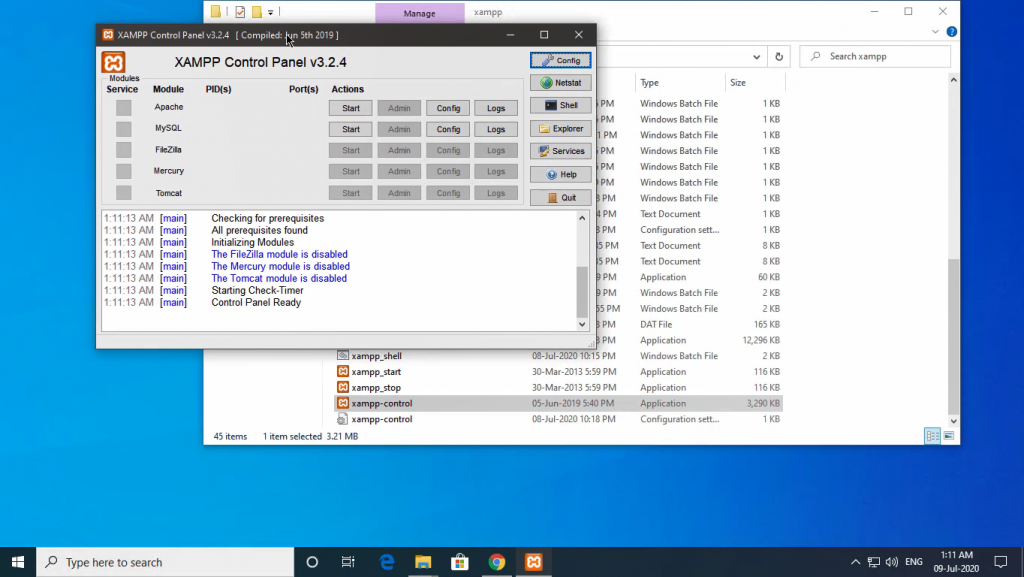
Start Apache and Mysql Softwares by clicking Start. By default apache reserves 80 port and MySQL reserves 3306 port.
How to configure XAMPP on windows 10
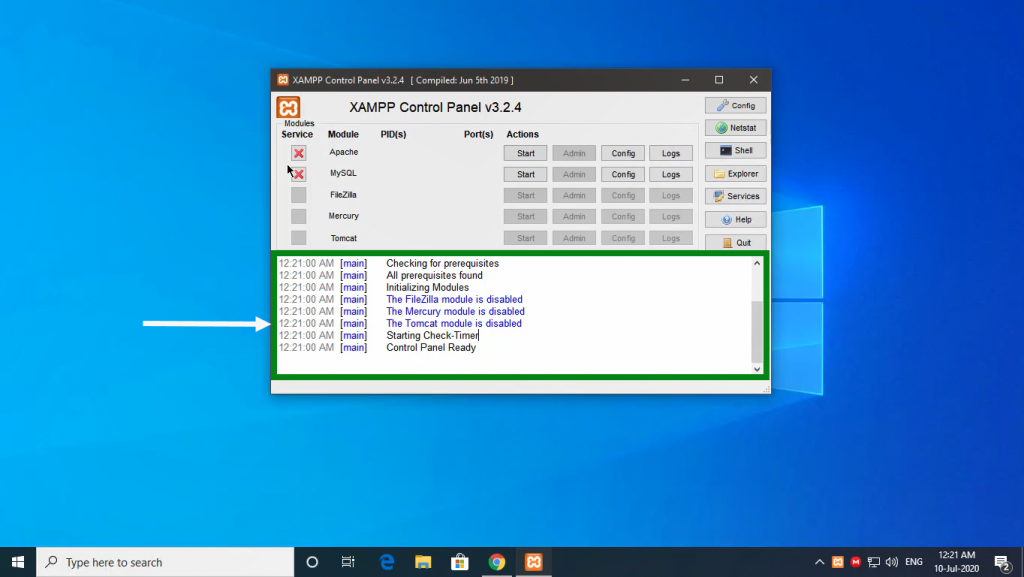
Debug Console – In XAMPP Control panel we can check the status and logs of the software working properly or not, even we can check the services installed or any error occurred.
Start and Stop Buttons – These buttons are used to start and stop services. if you are not configured to start them automatically, you need to start them manually.
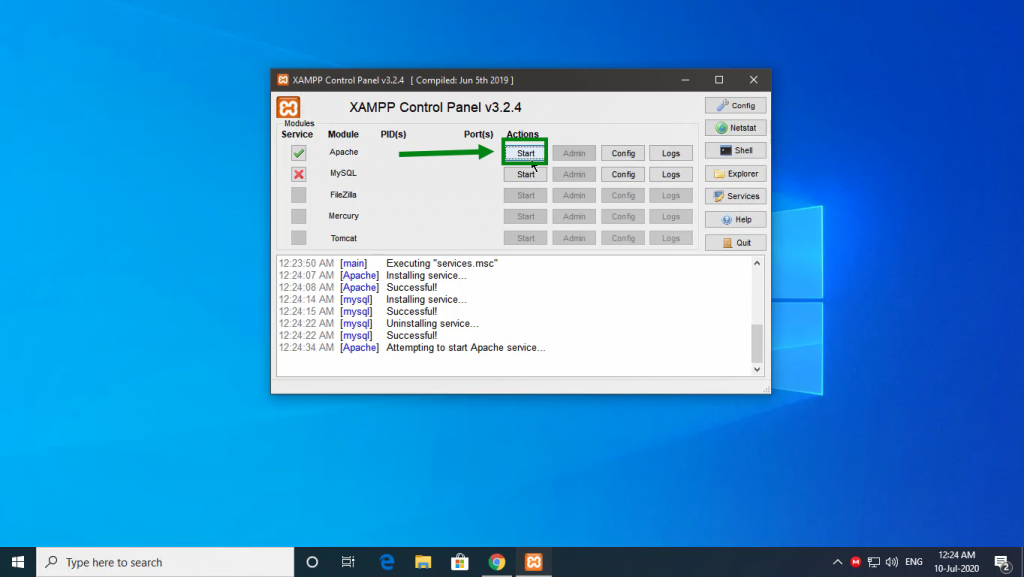
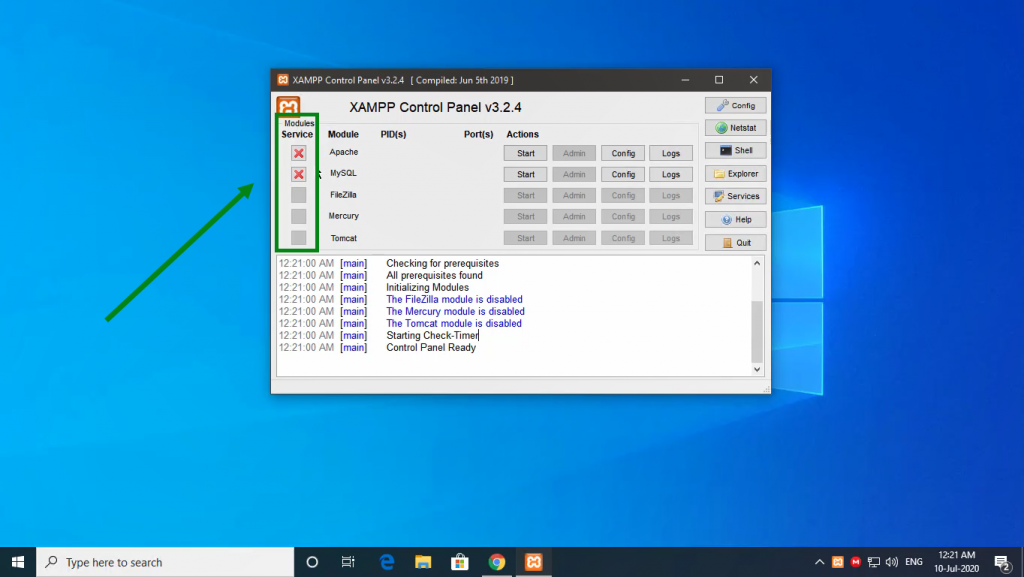
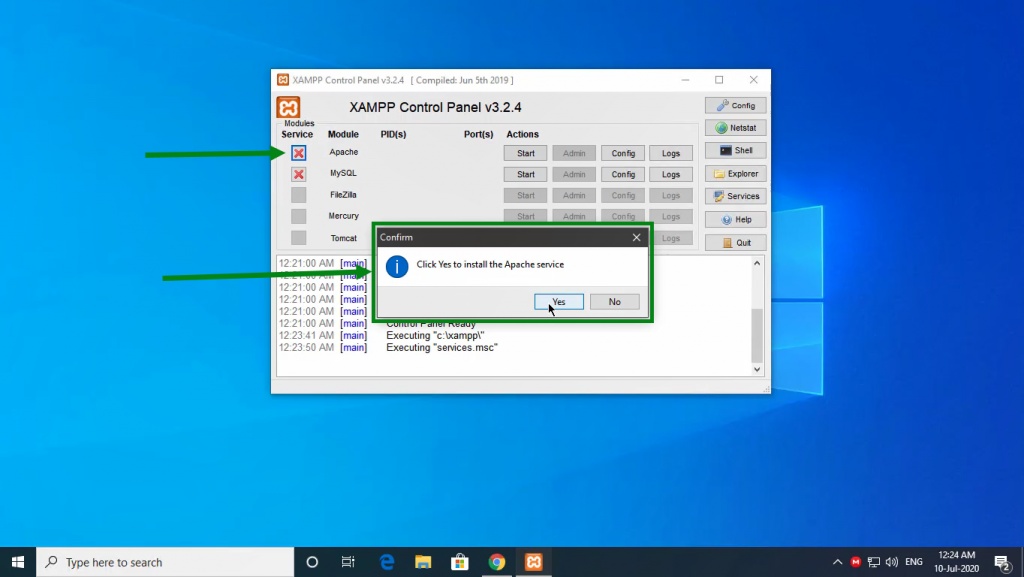
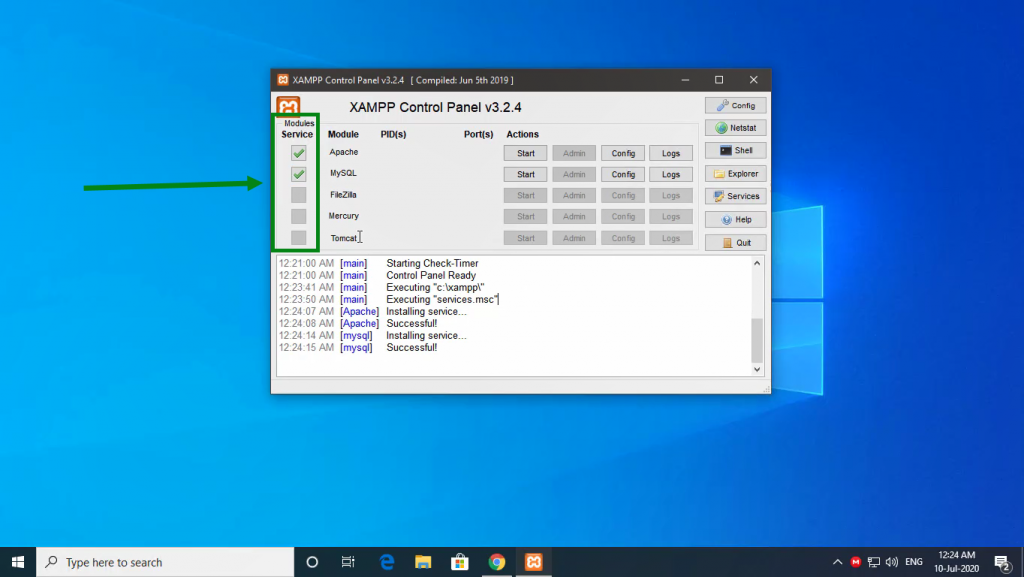
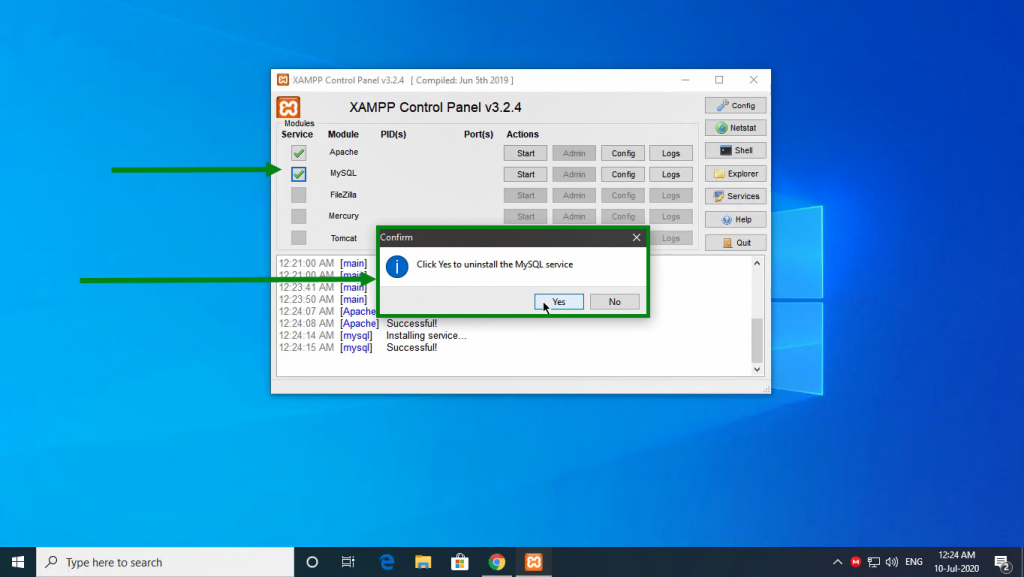
Services: services are used to start the servers when the computer is started, if you have not installed services then you need to start the servers manually. By default the services are not installed, we need to install them manually just click on the red coloured x mark it will ask for confirmation. To install the services or uninstall the services you need the administration rights.
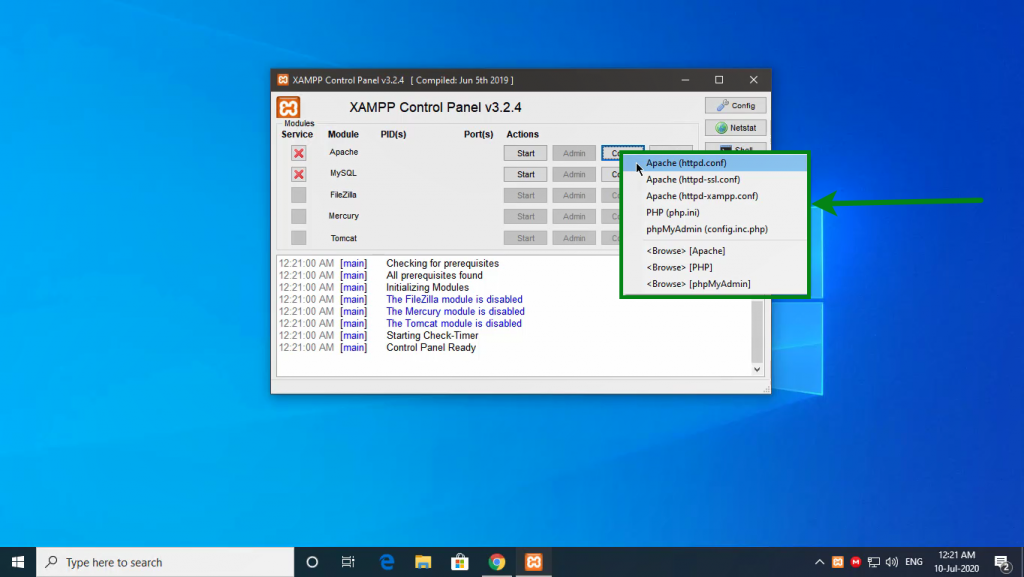
Config Files: These files are required to change or modify settings in Apache or mysql, click on config to make any changes.
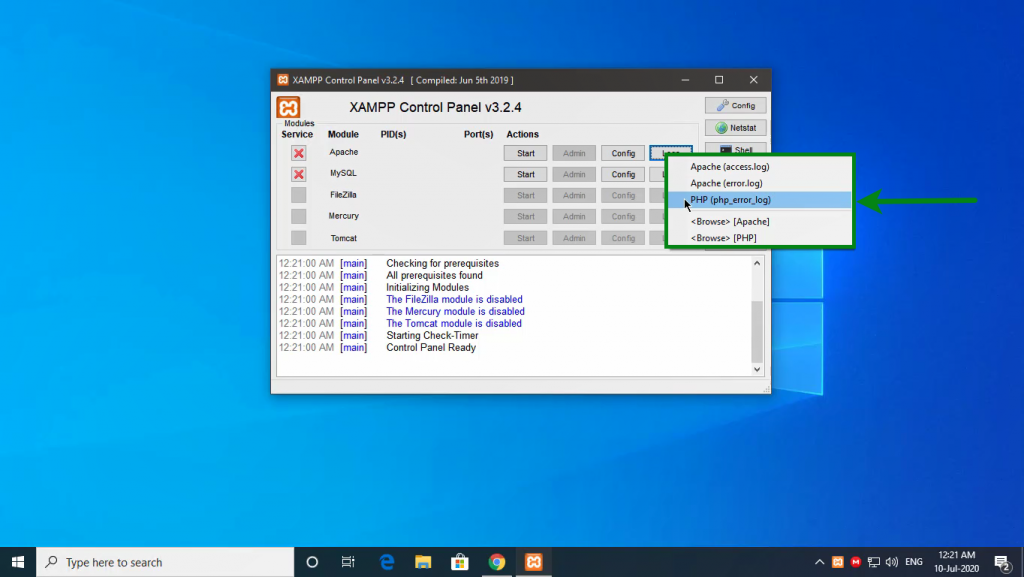
Log Files: In log files we can access error_log and access_log files, occured in Apache and MySql.
Change Editor: We can change the default text editors, when we are opening the logs or config files by default it will open in the notepad if you want to change the text editor you can change it.
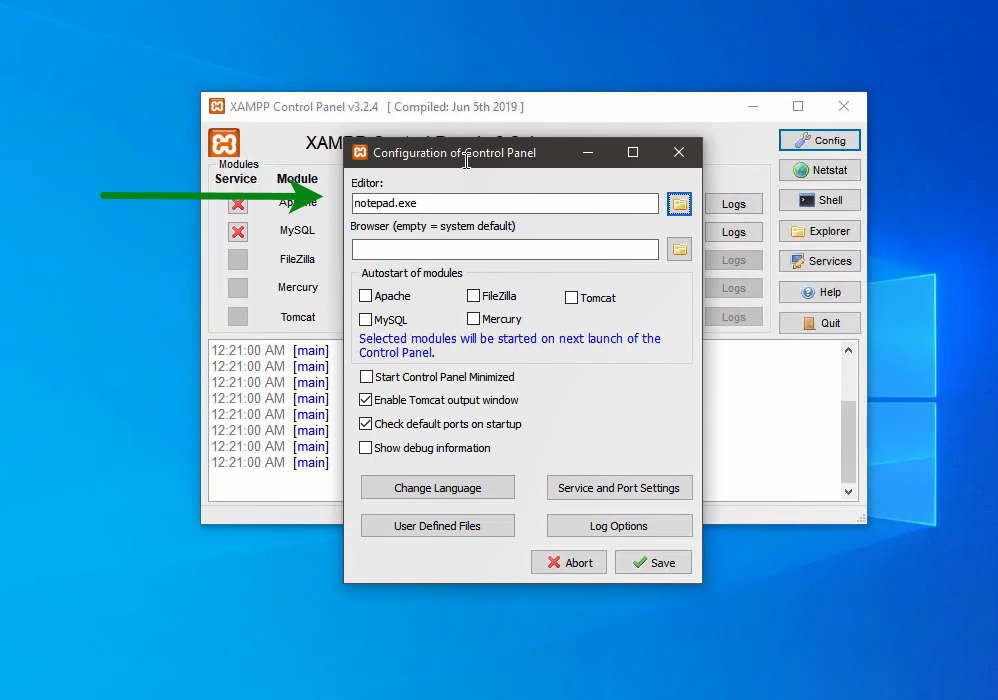
Default Browser: By default, system uses default browser. If you want to change the default browser for XAMPP we change it here.
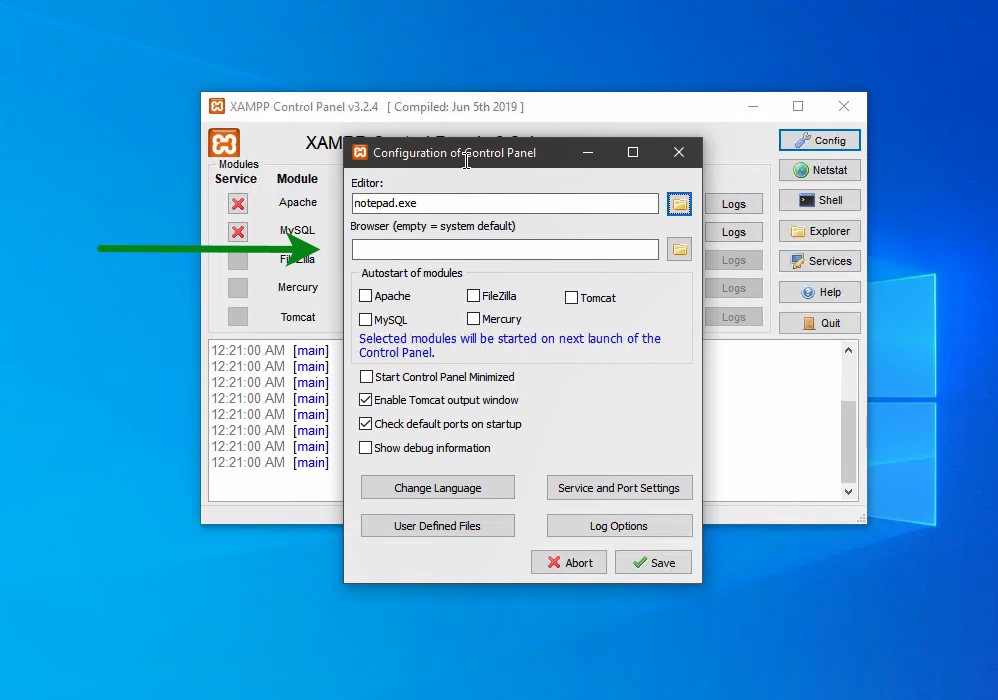
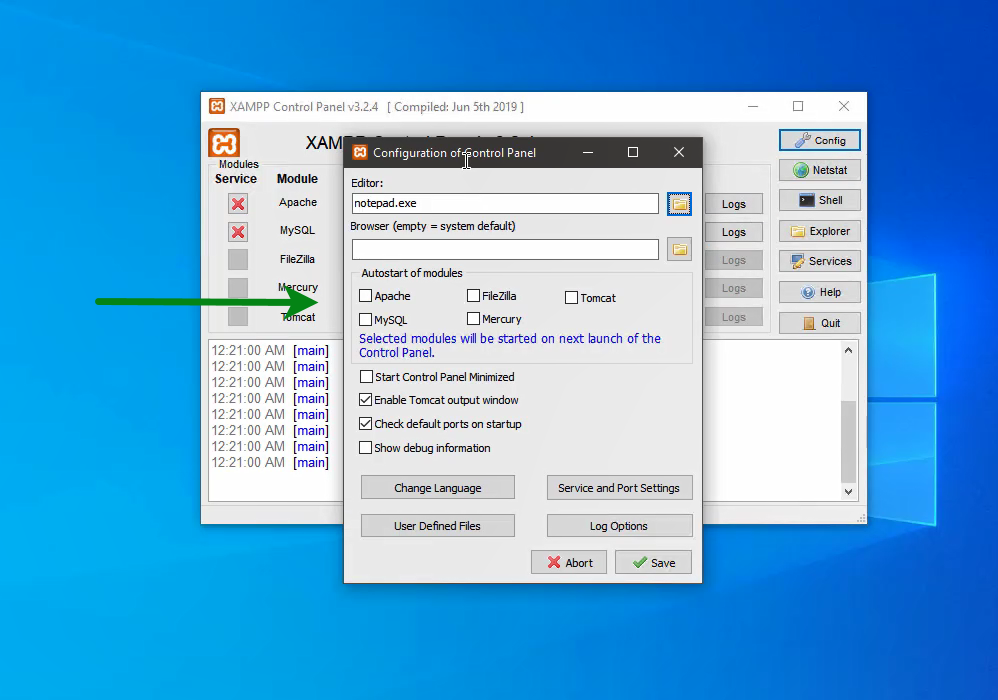
Autostart Modules: To automatically start the Apache & MySql services, we need to select autostart modules.
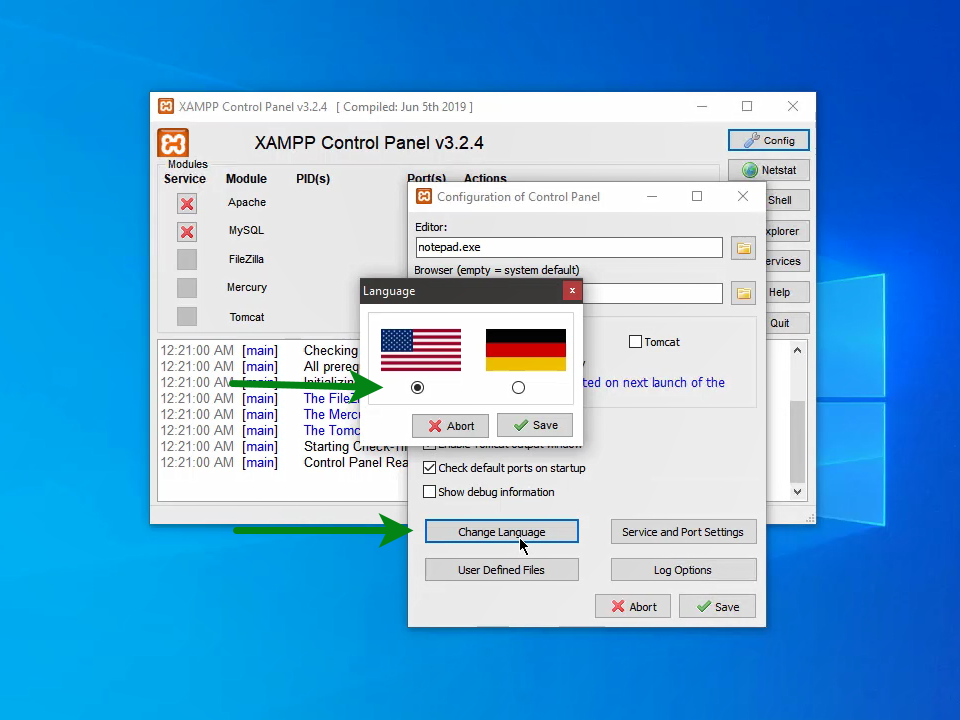
Change XAMPP Language: If you want to change the XAMPP Control Panels default language you can change the language by changing it.
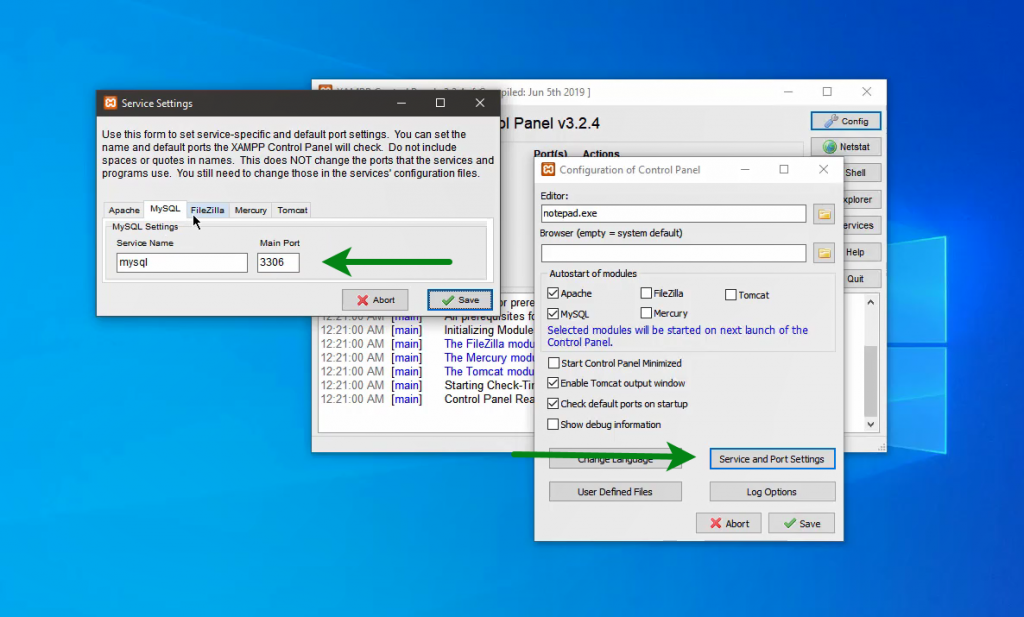
Change Ports: We can change the default service name in XAMPP control panel, but it doesn’t effect defalt services & ports
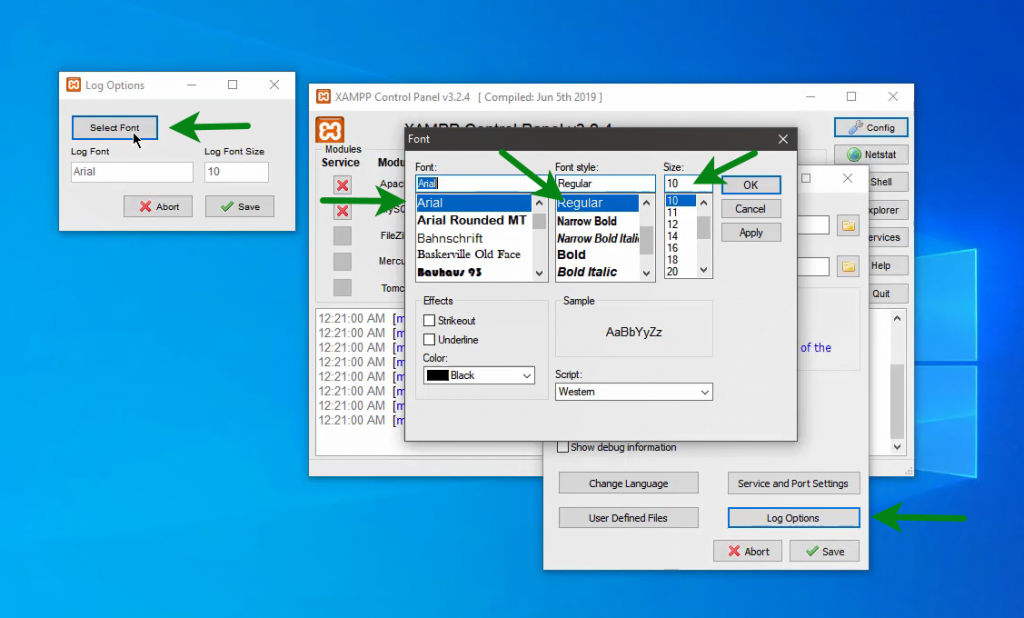
Change the log File Related Options: we can change the default font and font size for the log files.
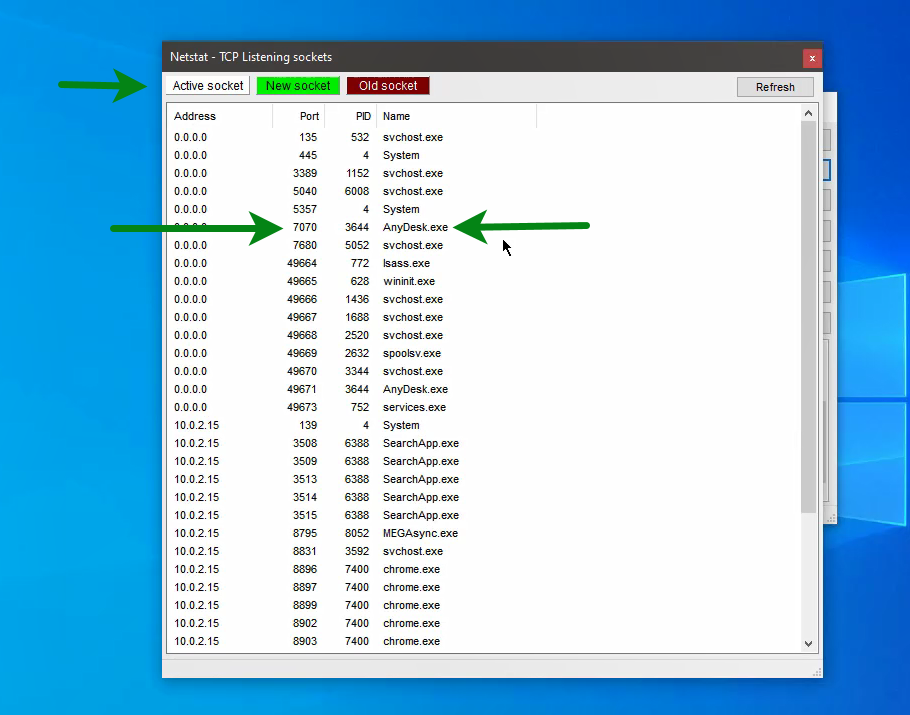
Netstat (TCP Listening Sockets): By default, XAMPP will provide an option to check which ports are in use and which application or service is using the port, to troubleshoot the ports or to check the usage of the ports. we will use this netstat tool which is provided by XAMPP control panel.
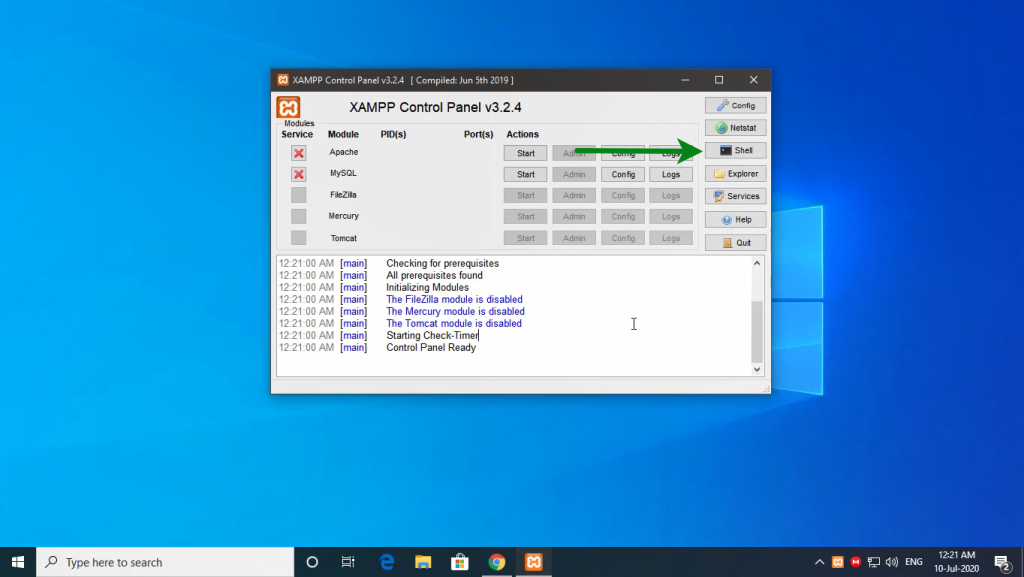
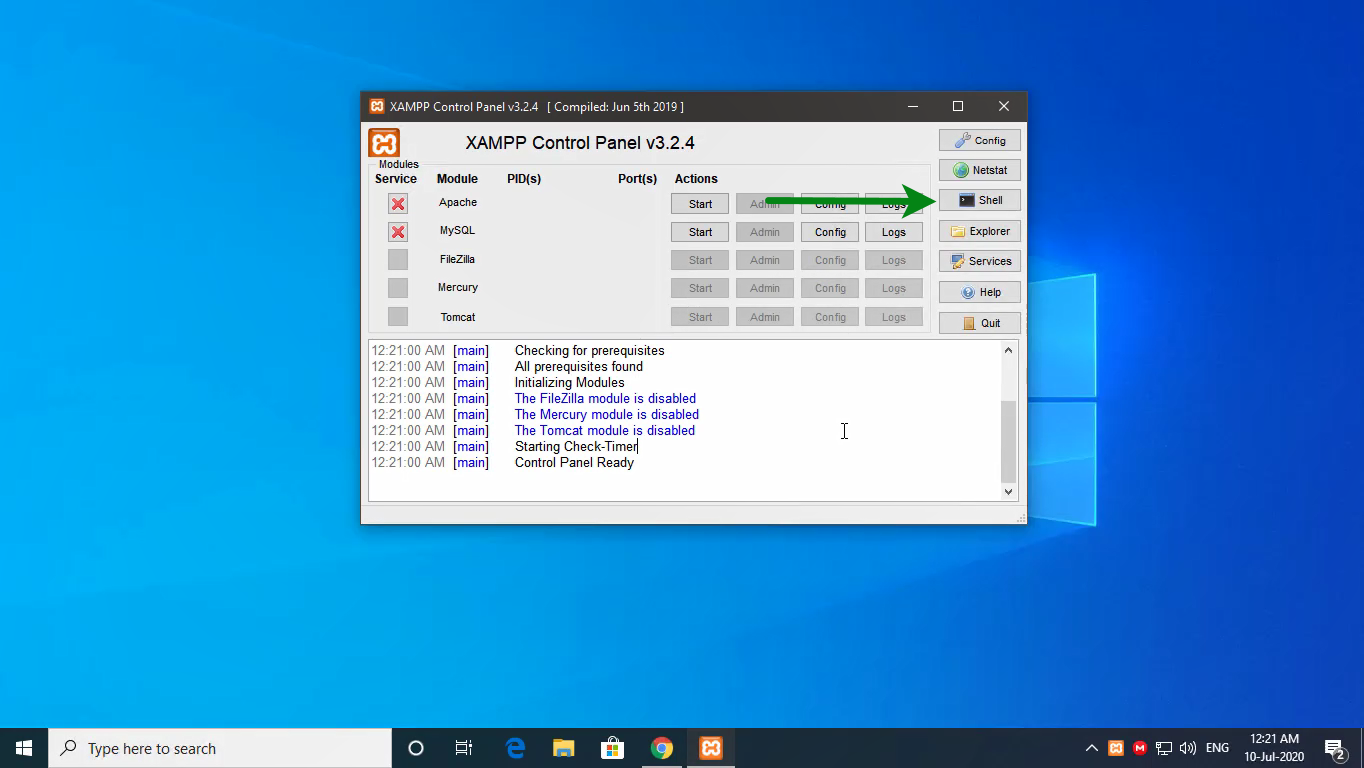
Shell (Command prompt): we can directly open the command prompt in the root folder of XAMPP, we can use the option which is provided by the XAMPP Control Panel.
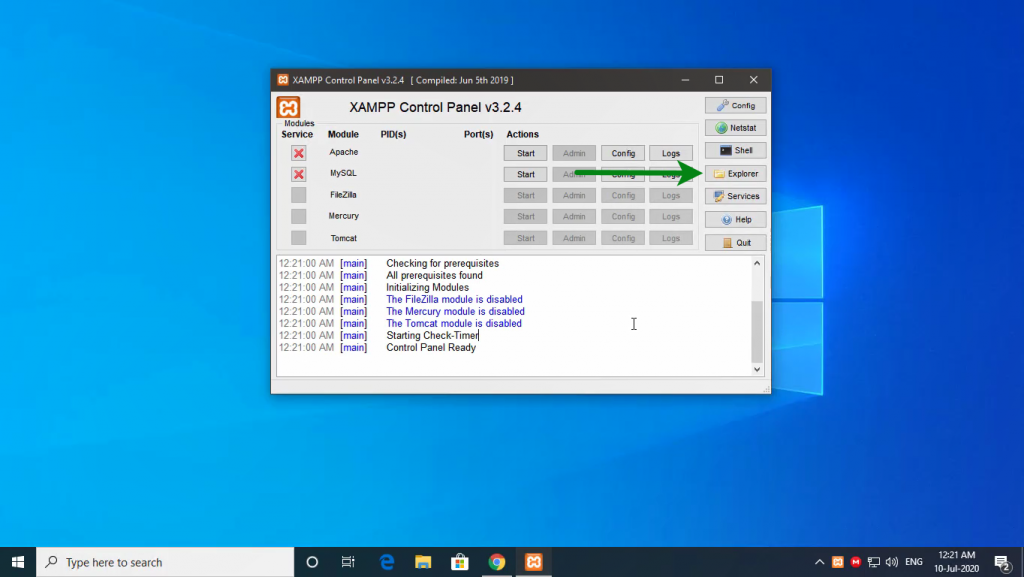
File Explorer: we can directly open the XAMPP Root Directory, this option is provided by XAMPP Control Panel.
services.msc: if we want to open the services.msc, to manage the autostart services then we can directly use the option which is provided by the XAMPP control panel.
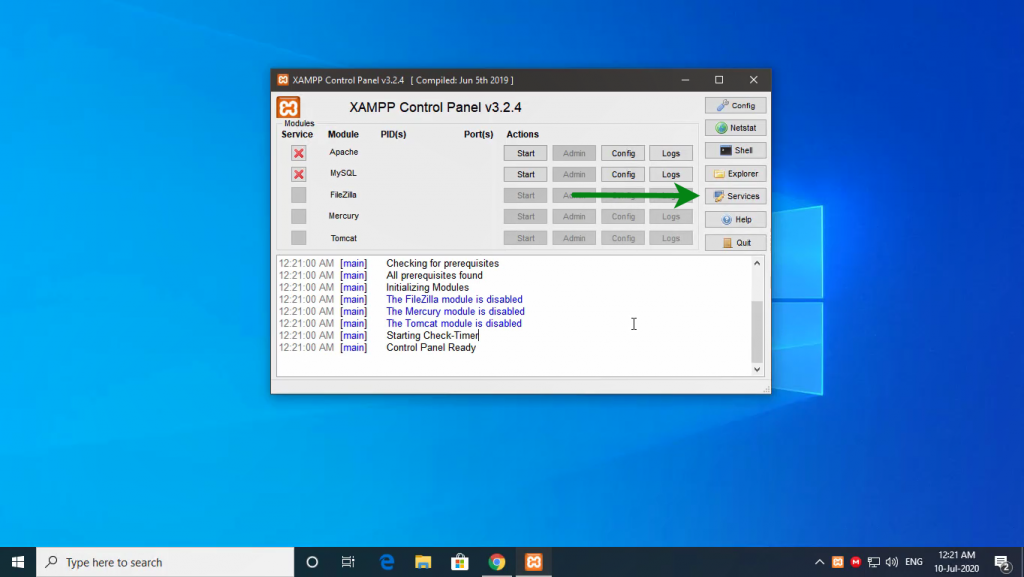
How to enable Additional PHP Extensions

- open XAMPP Control panel using any method.
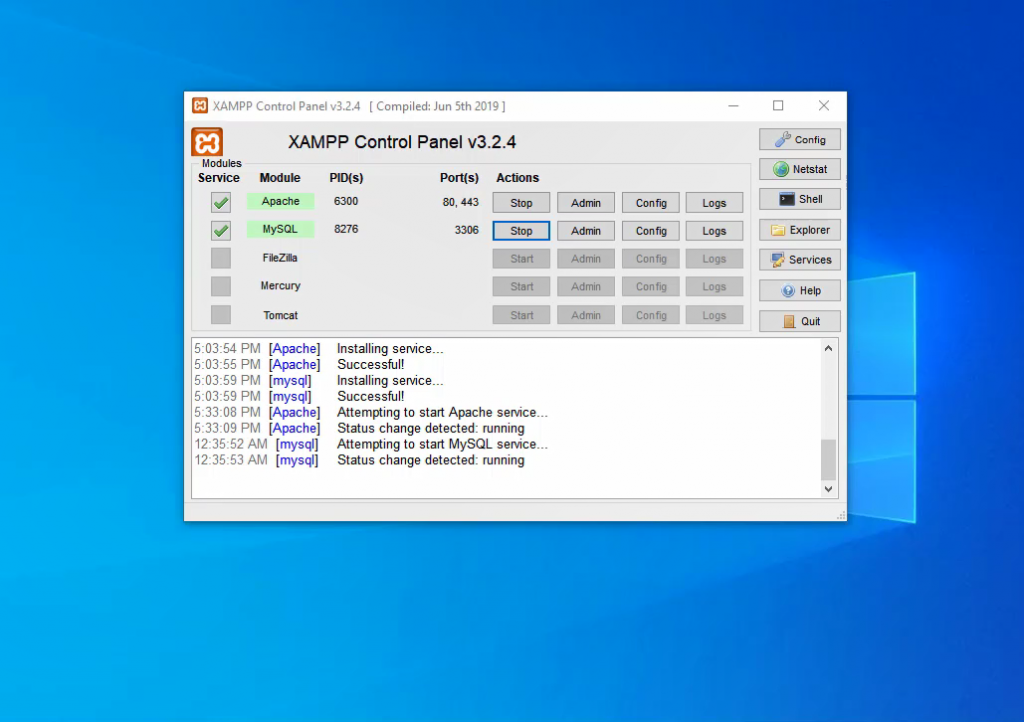
- open Apache -> config -> php.ini.
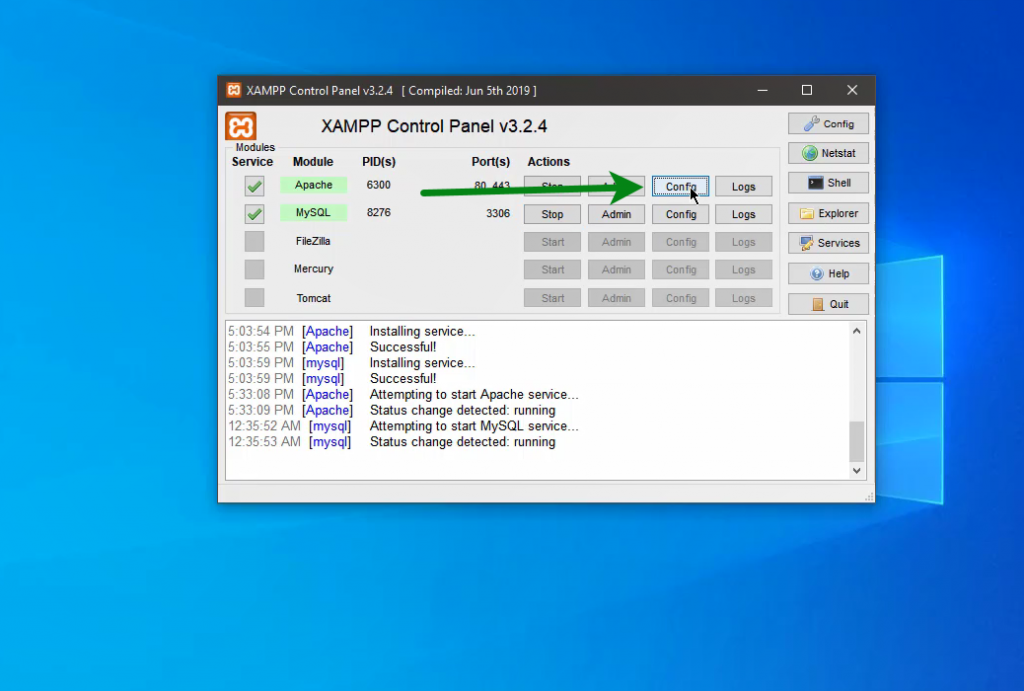
Click config button 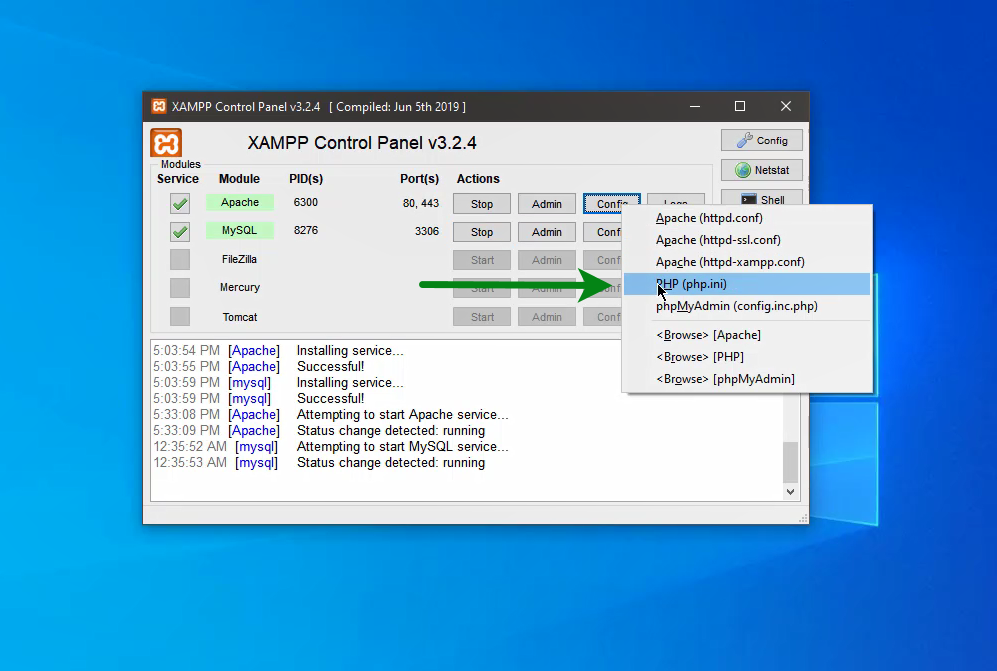
Click on php.ini it will open php.ini in a default text editor. - Find using “dll” or “dynamic extensions”
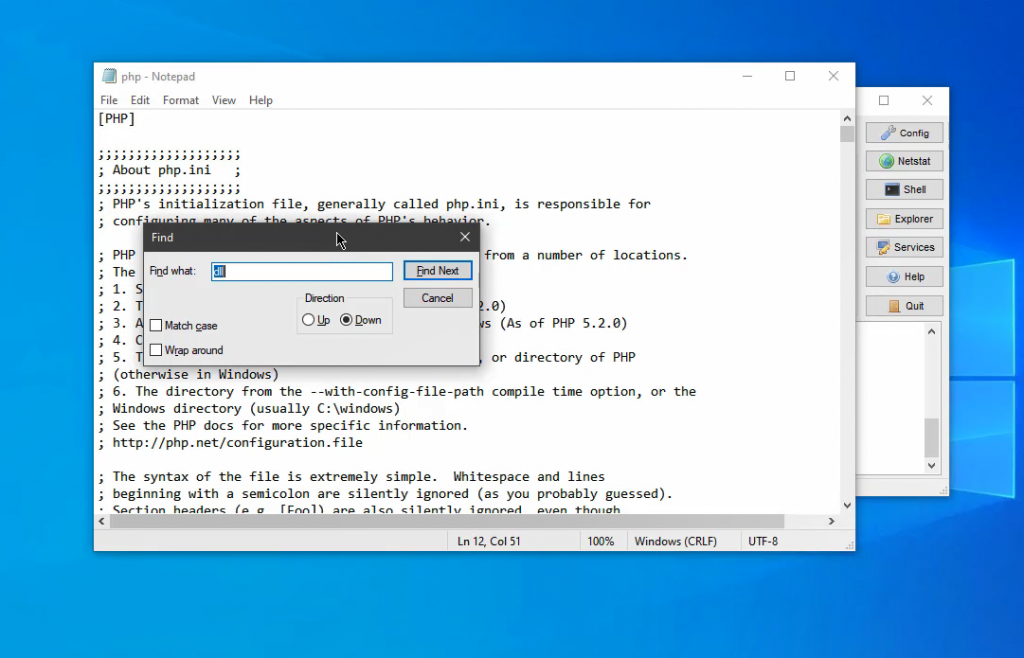
- Go To PHP Extension Directory and check whether the extension is available or not.
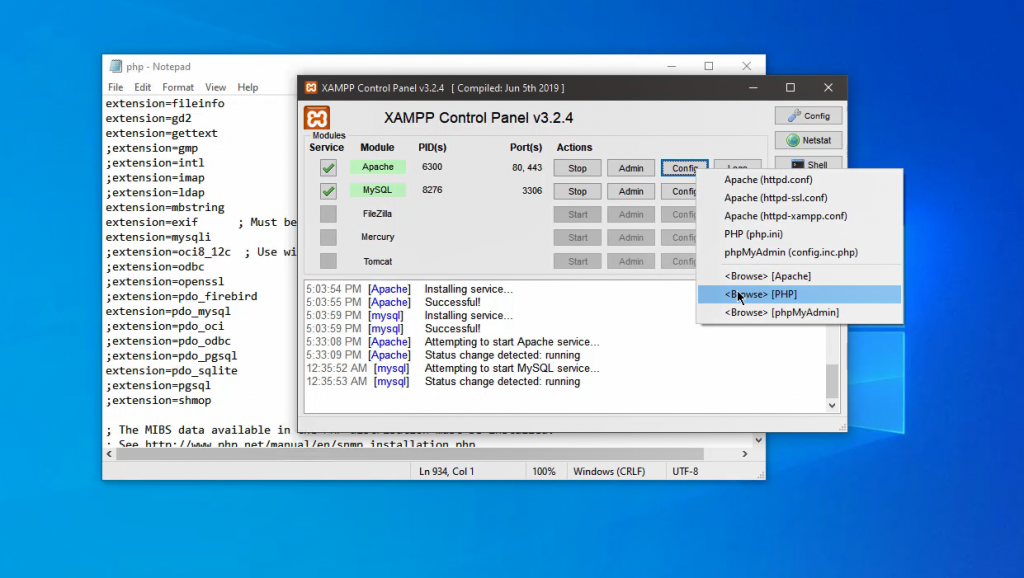
By clicking “Browse PHP”, you will go to PHP directory. 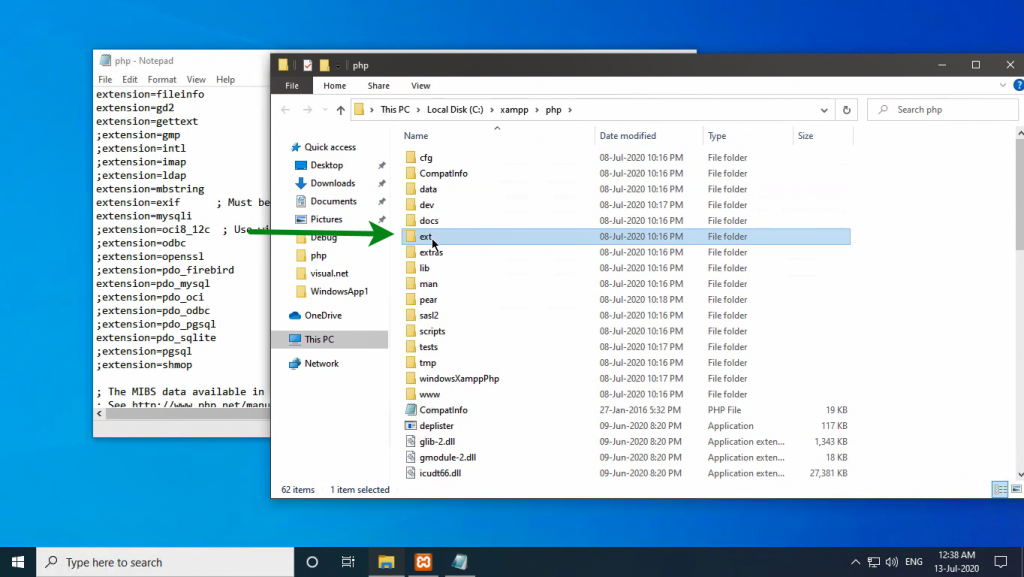
Click “ext” and goto PHP extensions directory 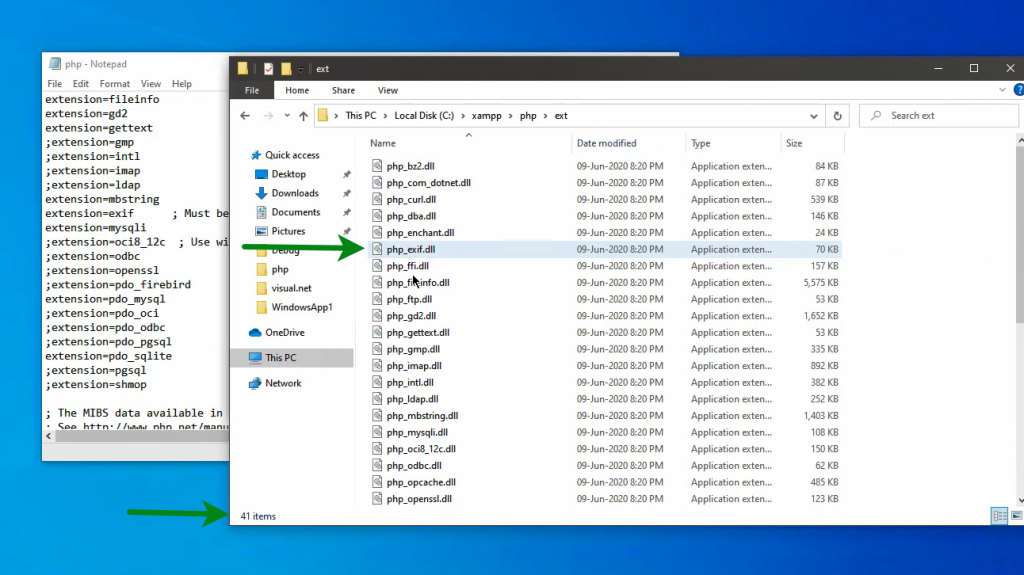
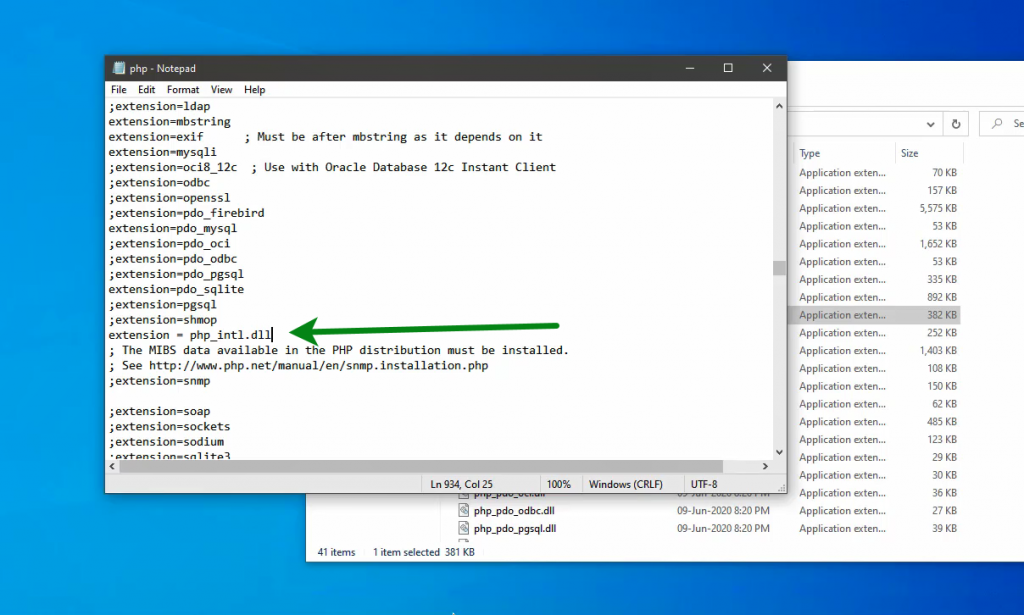
These are available PHP extensions supported to your current PHP version, provided by XAMPP - To enable a PHP Extension we need to add or uncomment the extension name in php.ini.
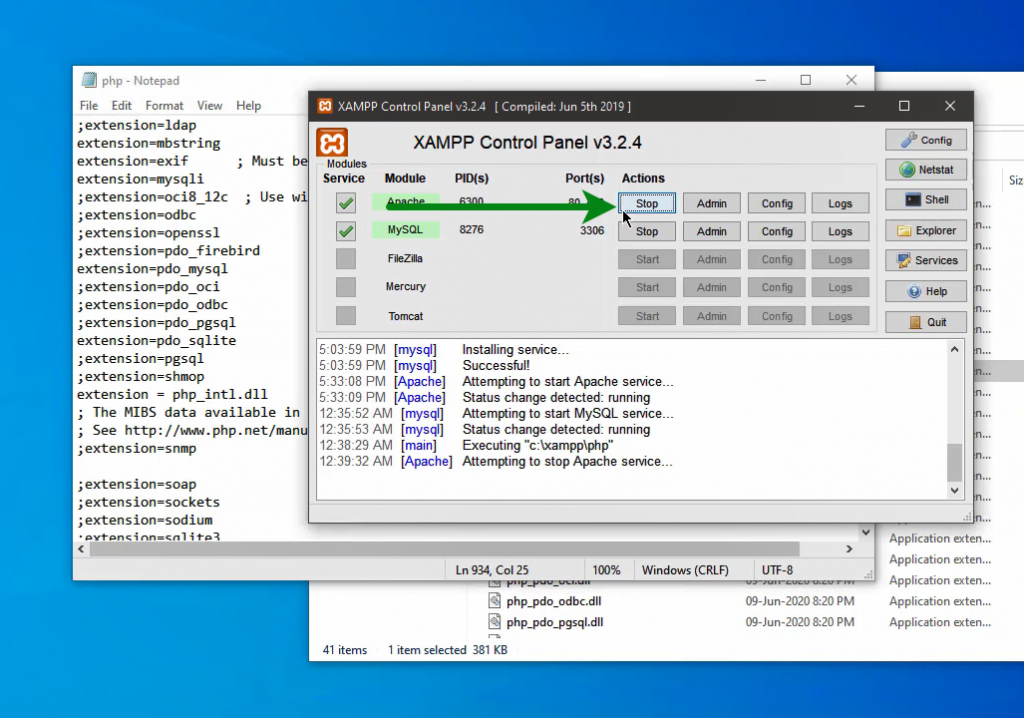
- Restart the APACHE server (Stop and start)
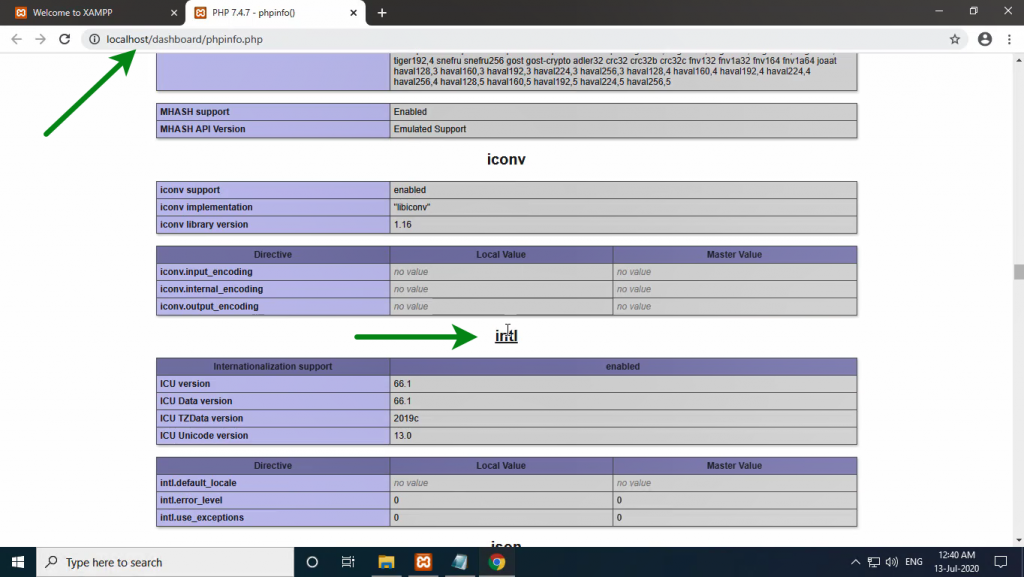
- Goto phpinfo and check for your extension, I added intl extension.
How to add 3rd Party extensions in XAMPP
How to fix apache not starting on XAMPP

- check the ports are in use or not in netstat option in xampp, stop the service (as shown below) by using task manager.
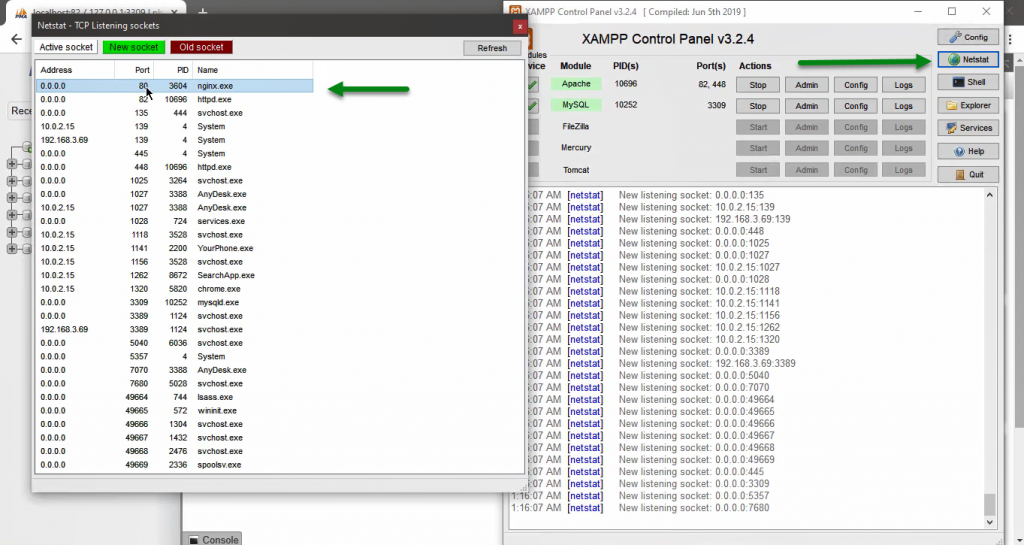
- After stopping the service, you can see that by red indication.
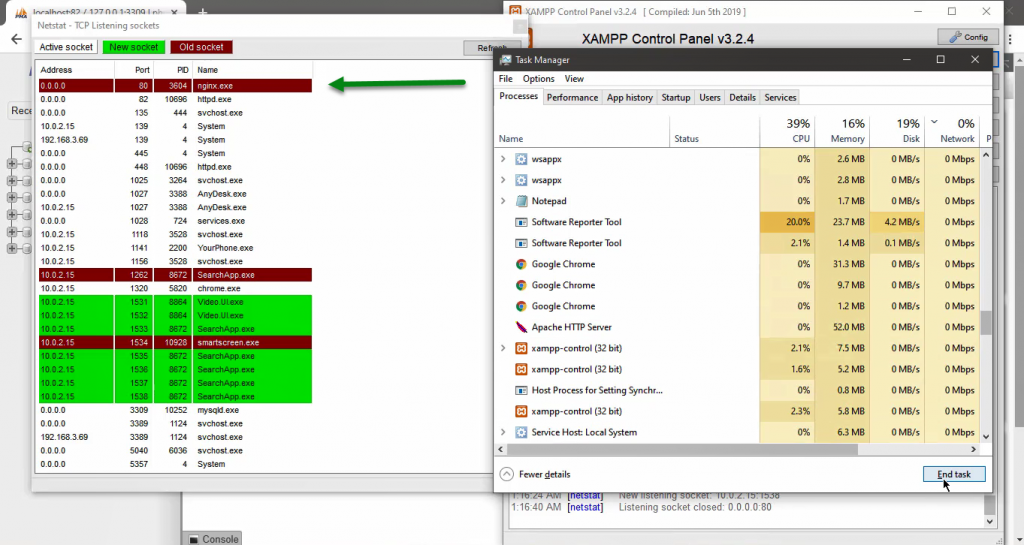
- After the port is free and no other software or programs are not using that port, you can start apache or any service.
How to increase PHPMyAdmin / PHP upload size on XAMPP
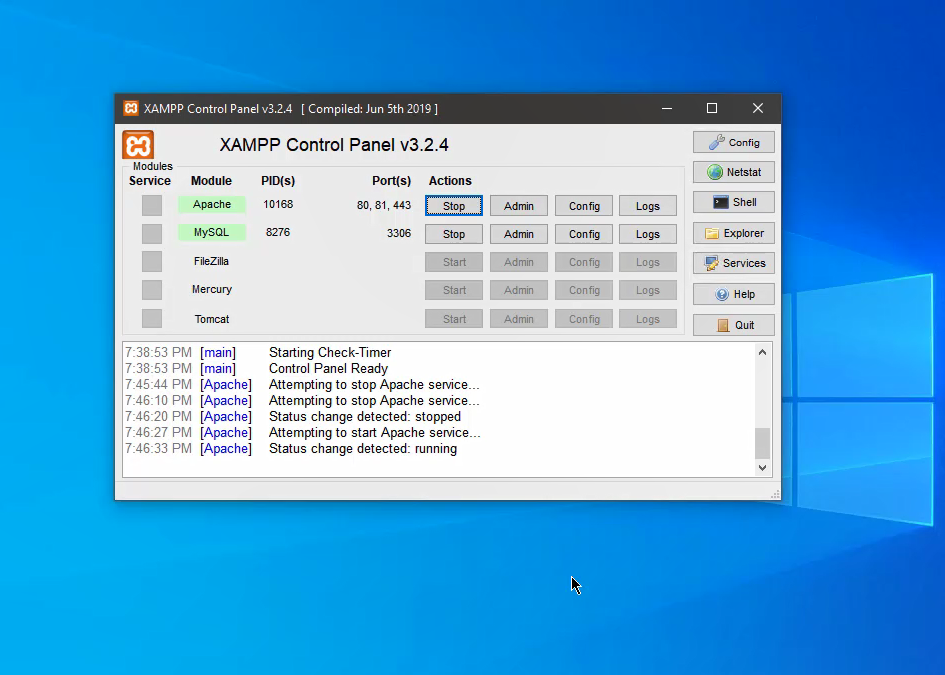
- Open the XAMPP Control panel and start the Apache and MySQL servers.
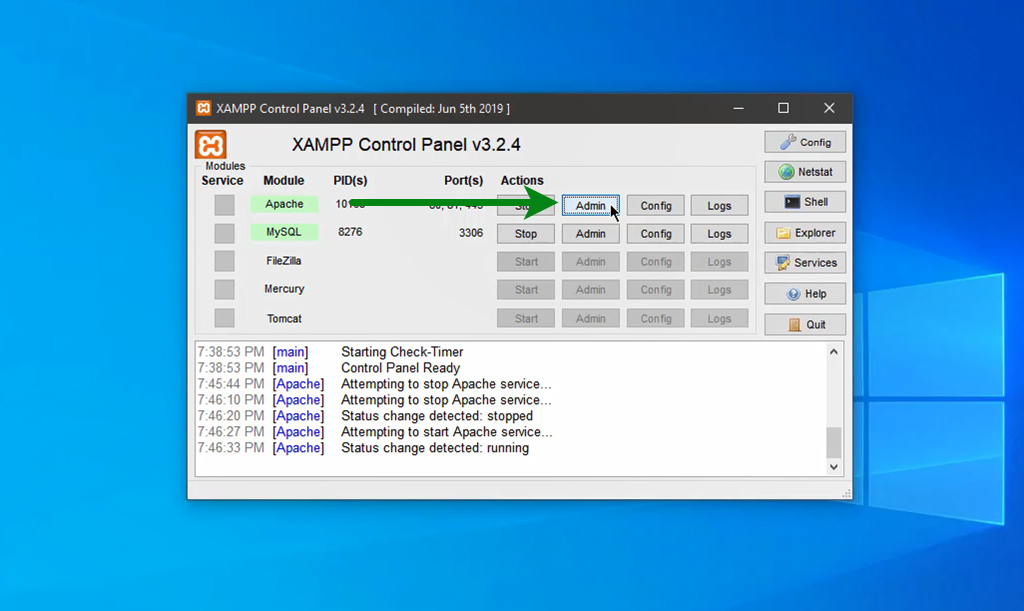
- Click admin and open XAMPP Dashboard
- Click PHPinfo from XAMPP Dashboard
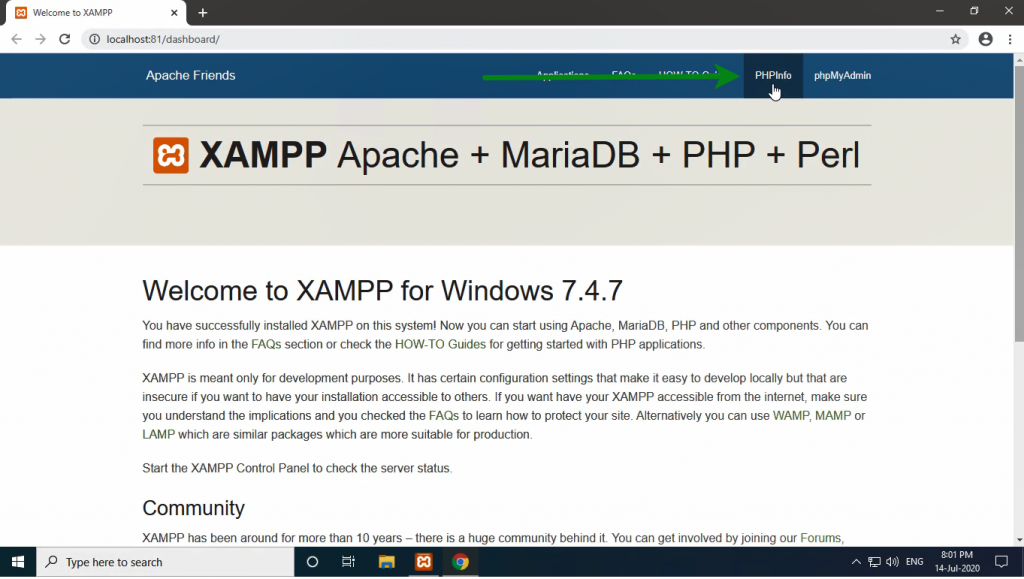
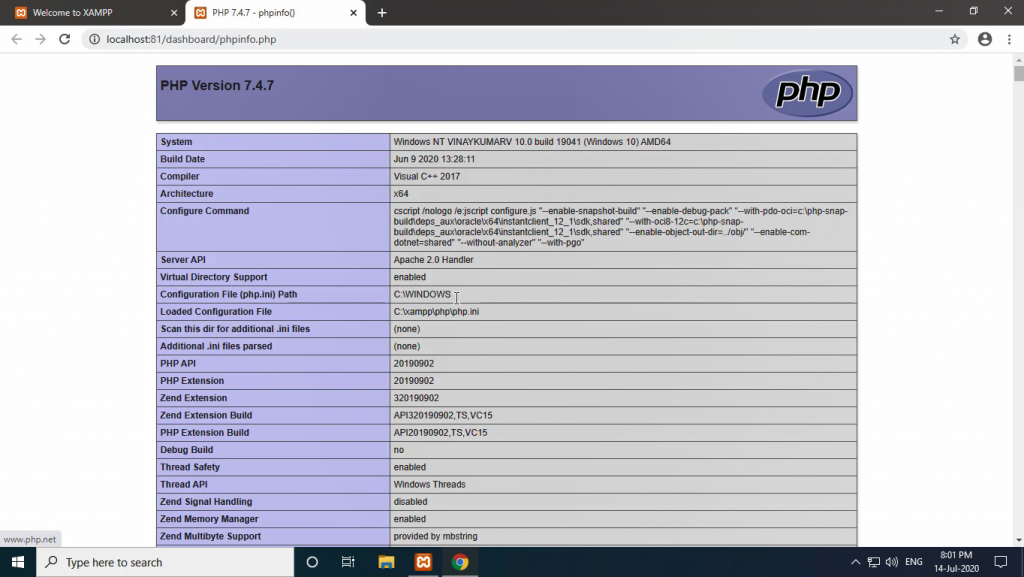
- Check the phpinfo Details
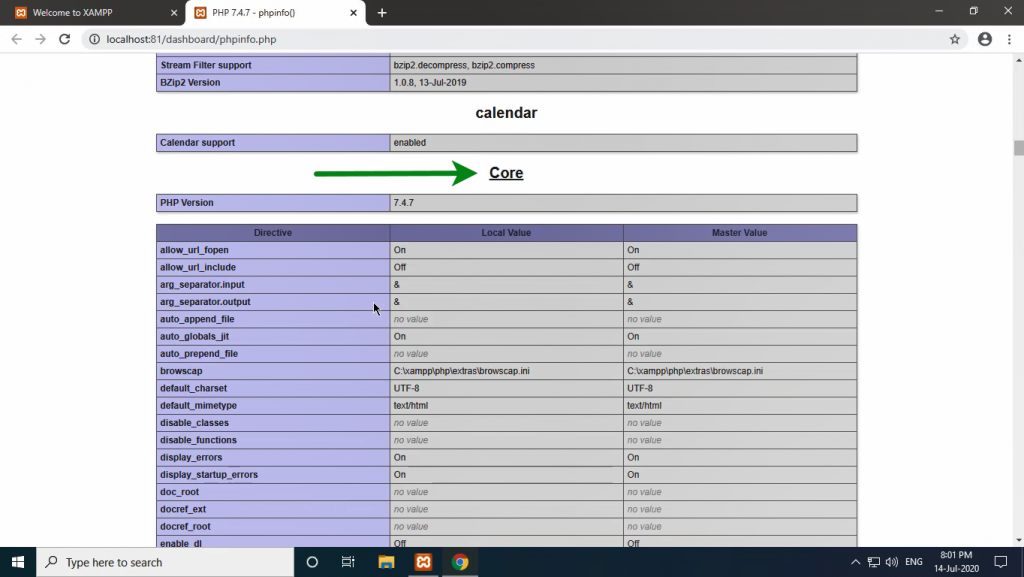
- Goto PHP’s Core Extensions Details.
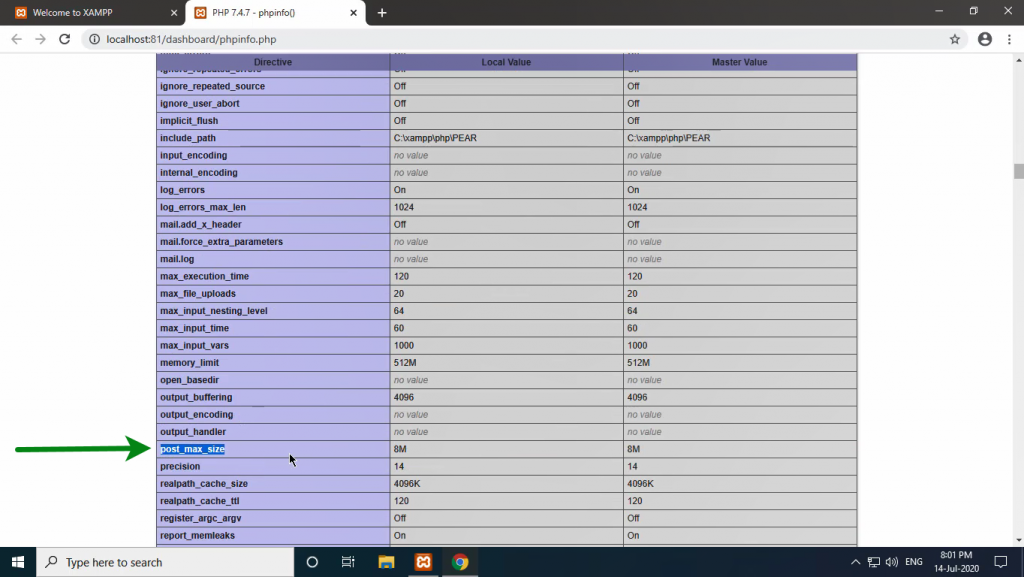
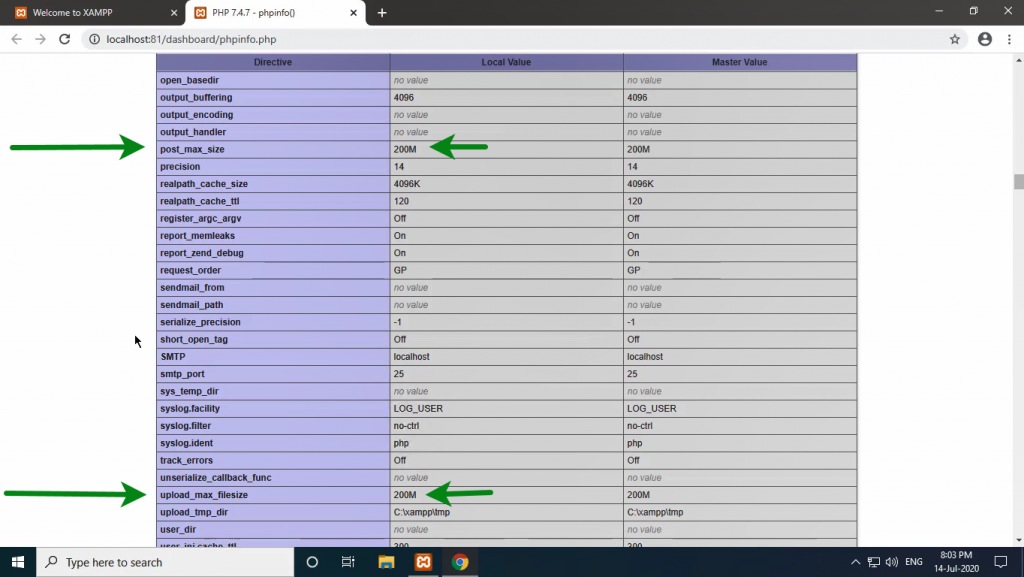
- Check for post_max_size Directive in PHP’s Core extensions Details. By default its value is 8M
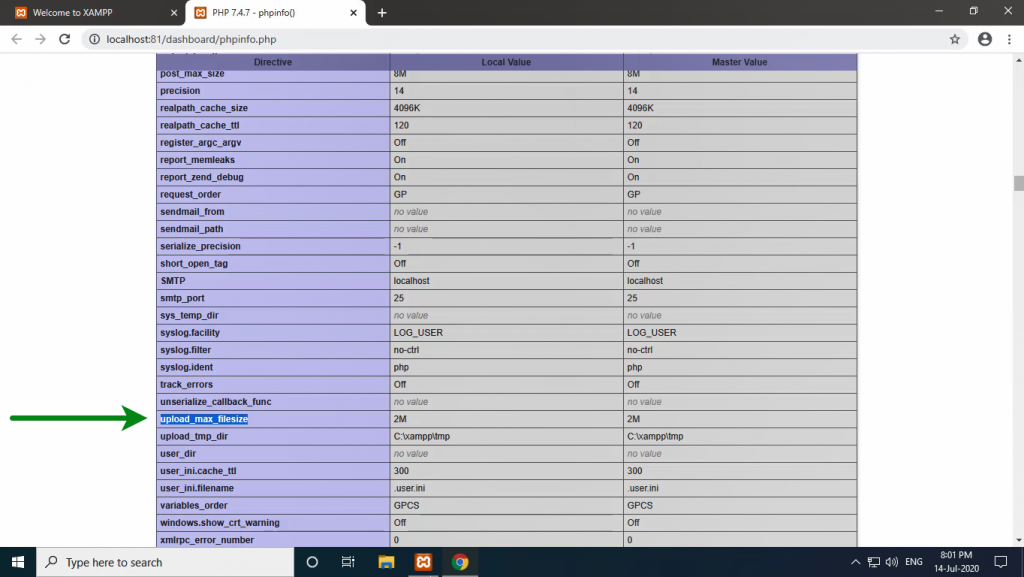
- Check for upload_max_filesize Directive in PHP’s Core Extensions Details. By default its value is 2M.
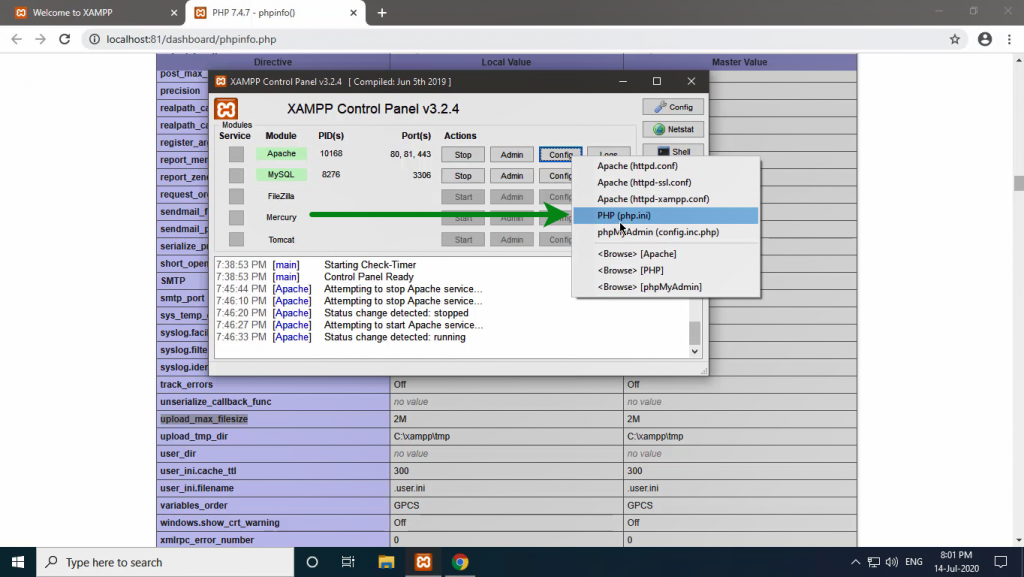
- Click on Config and edit php.ini file.
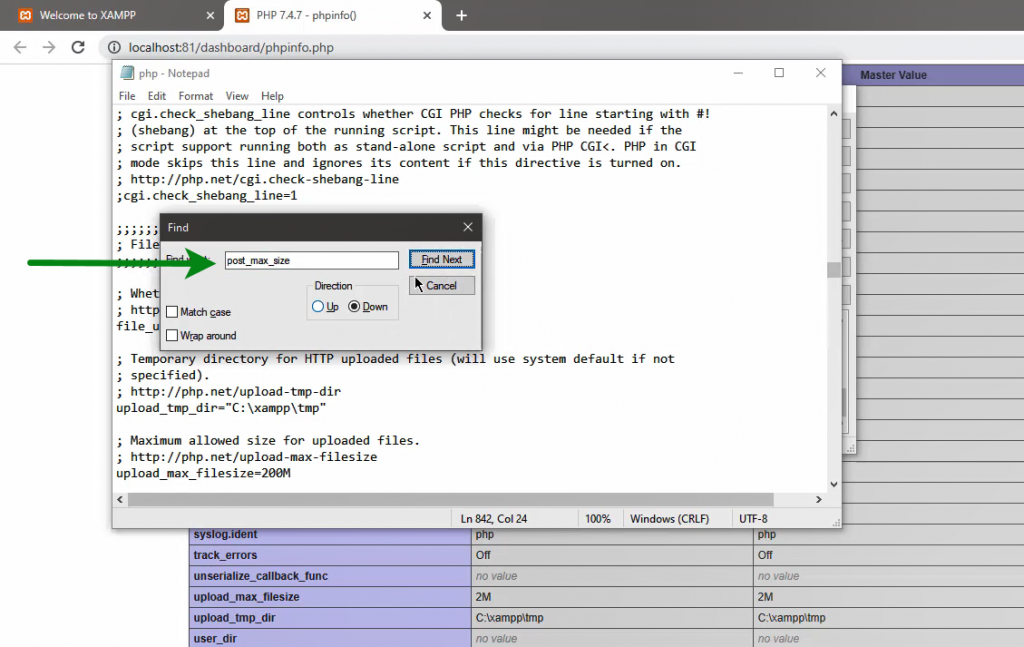
- Search for post_max_size directive in php.ini
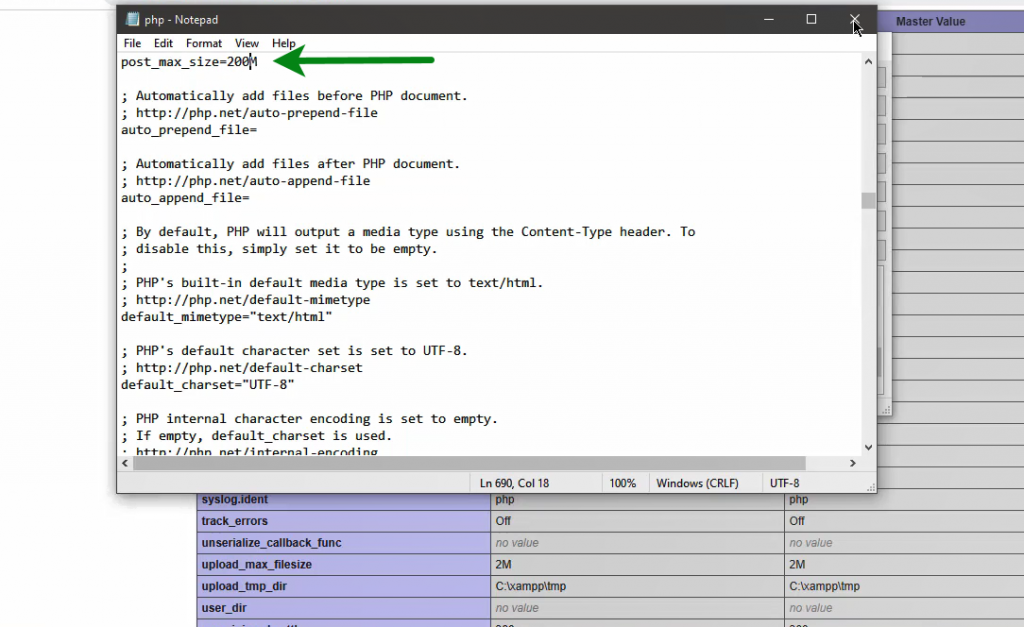
- Change the Value to the value of how much you want, by appending M to it.
- search for upload_max_filesize directive in php.ini
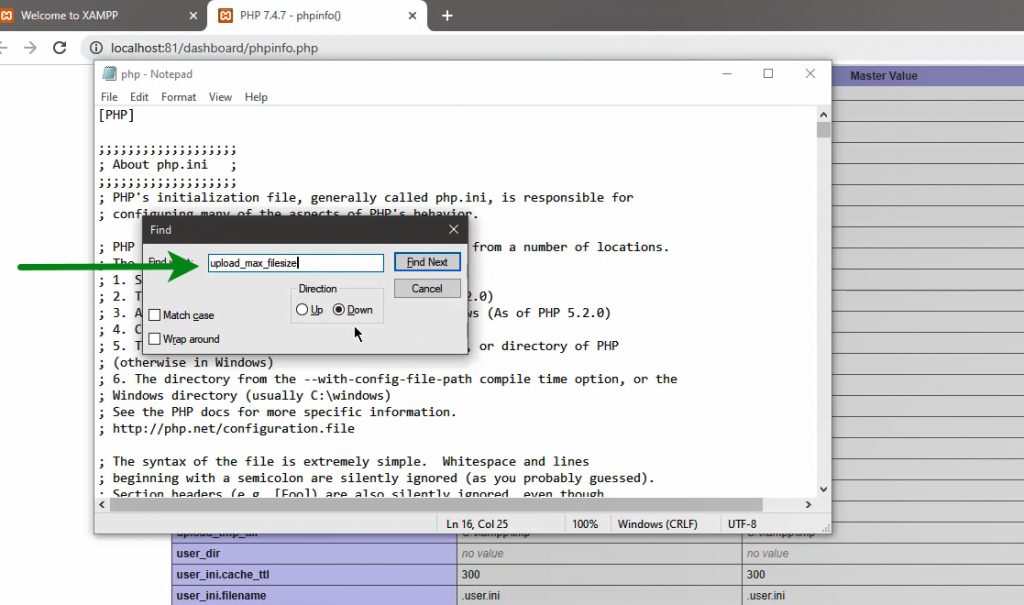
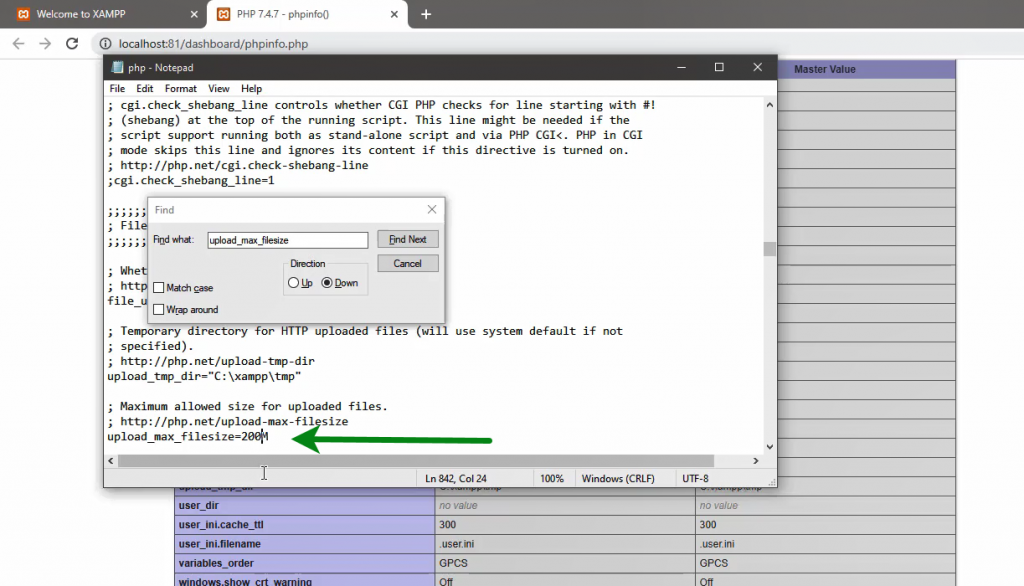
- change the value of the upload_max_filesize directive as much as you want and append the M to the value and save.
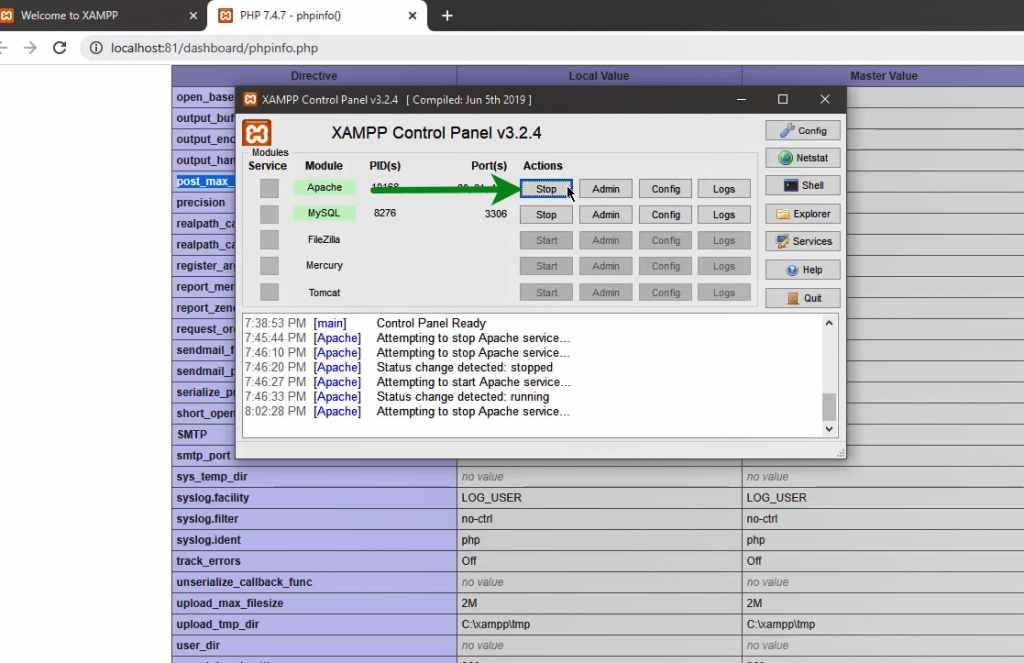
- Stop the Apache server.
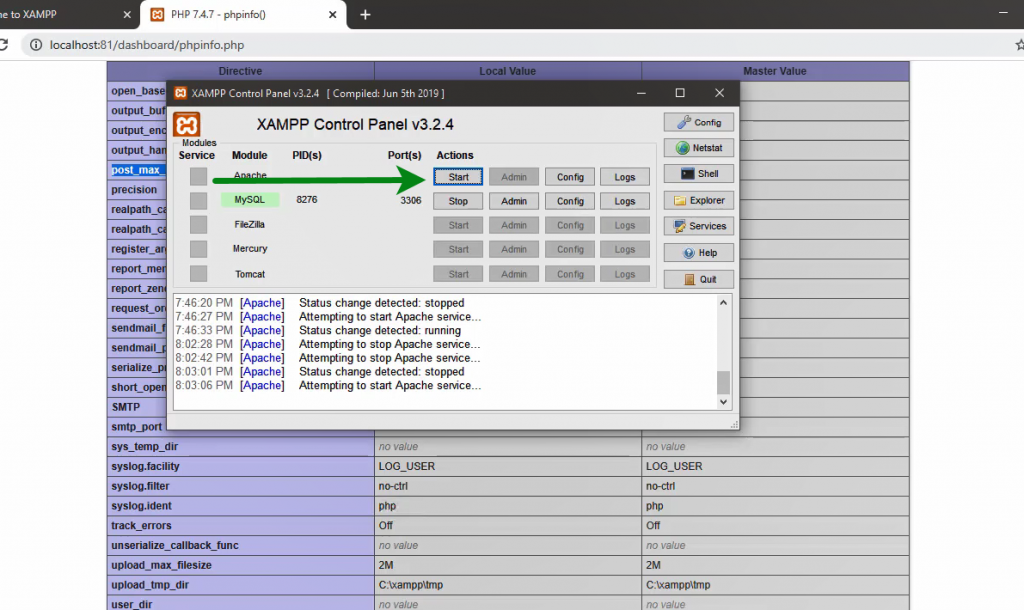
- Start the Apache server
- Check the phpinfo , whether the values are changed or not.
How to change PHPMyAdmin password and configuration on XAMPP
- Open Xampp Control Panel – using any method
- Start Apache & MySQL services and open PHPMyAdmin. Go to User accounts
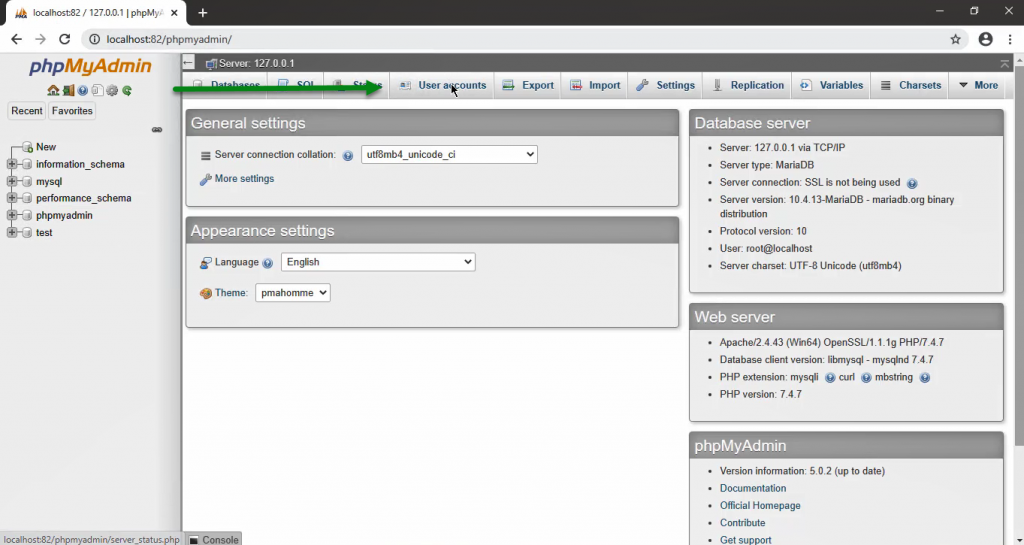
List of Users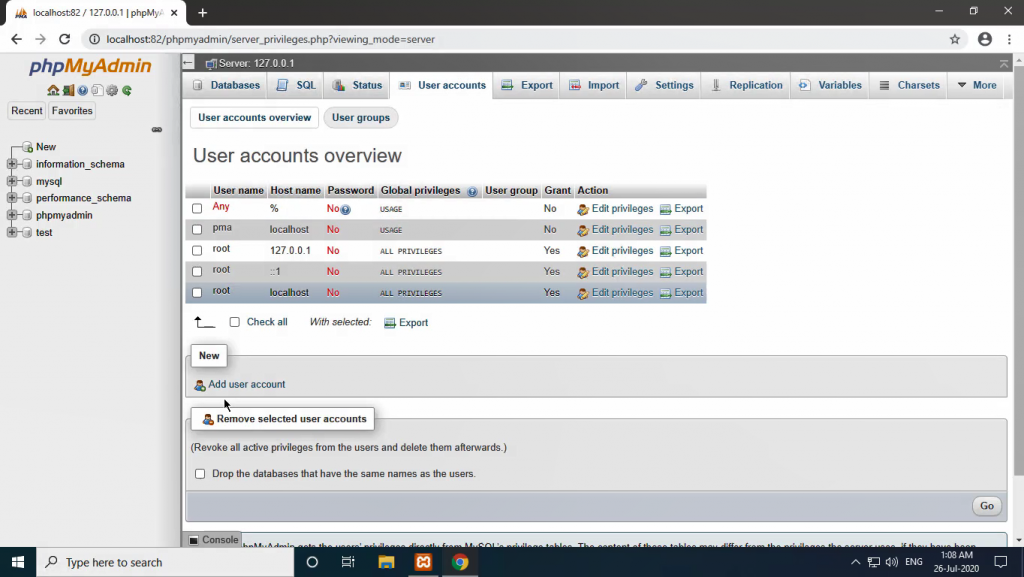
Phpmyadmin – Add users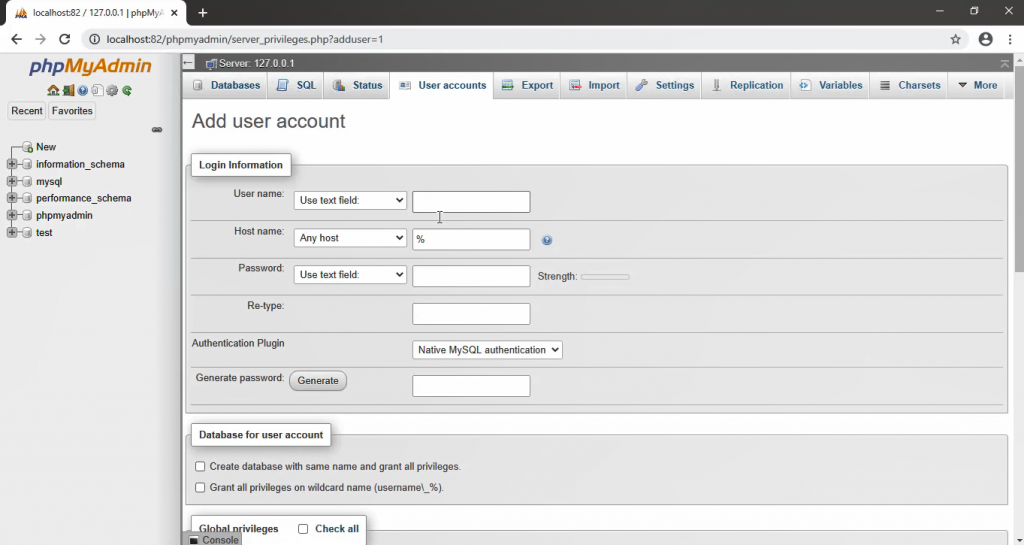
Phpmyadmin – assign Privileges to the user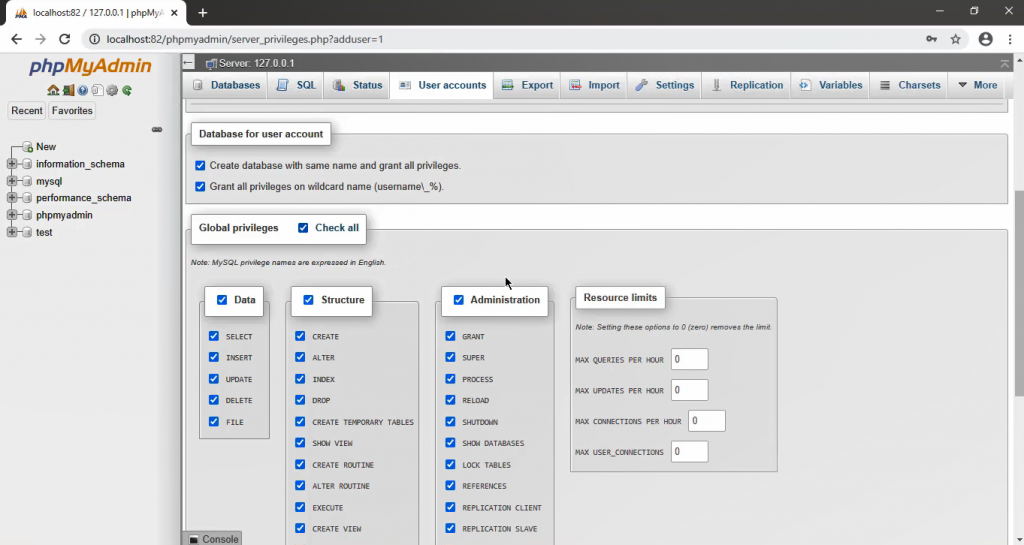
PHPMyAdmin – User-created Successfully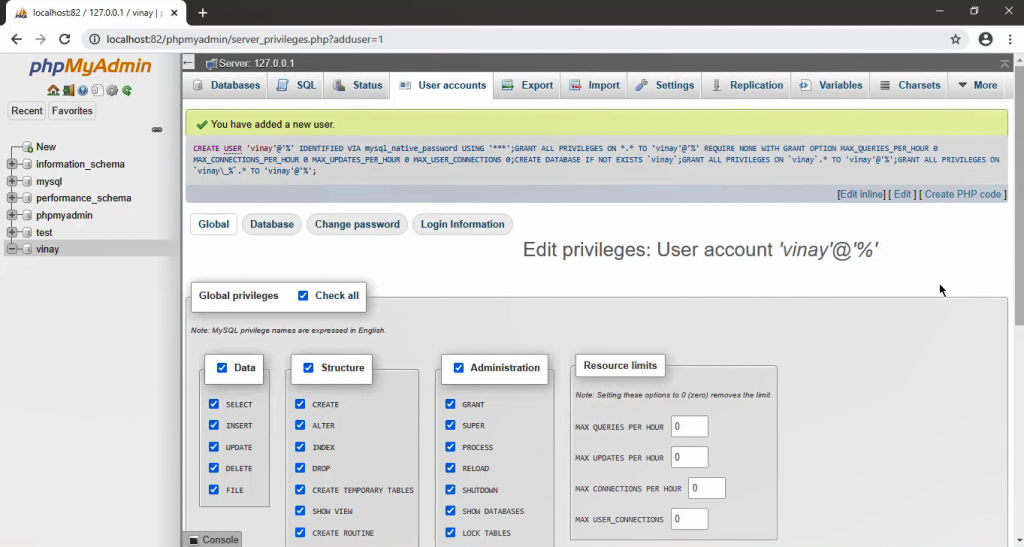
- After changing the password, to login in PHPMyAdmin need to change “auth_type = cookie” in phpmyadmin’s config.inc
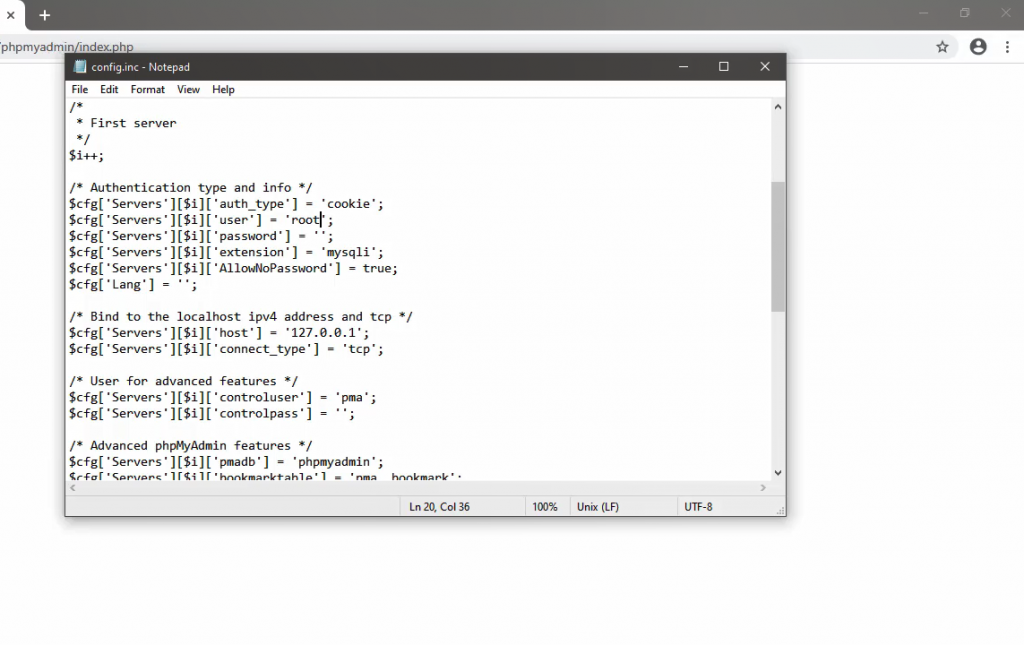
If you have changed the port number “localhost:3309” or “[localhost / 127.0.0.1]:[your port number]”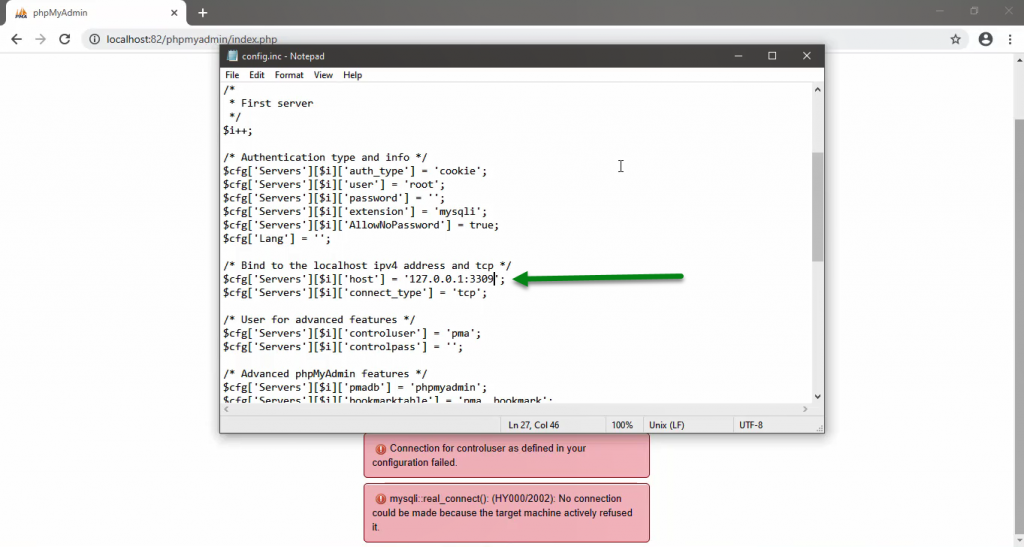
How to check which ports are in use using XAMPP
- Open Xampp Control Panel – using any method
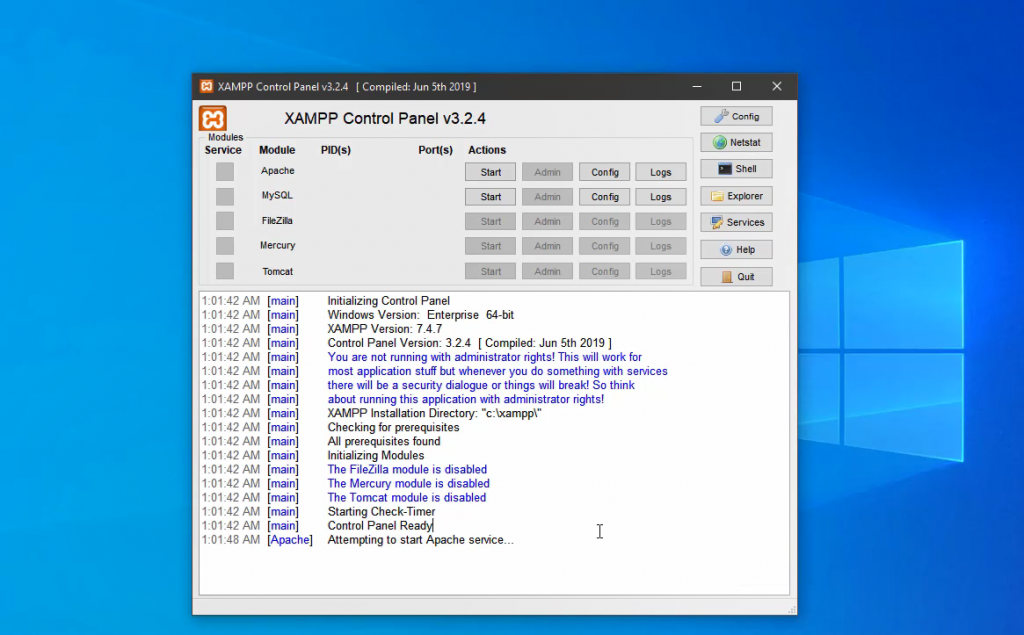
- We will see the debug information XAMPP control panel. if you can’t see the errors like ports are already using, then goto config button which is shown at the top right side. Then enable show debug information.
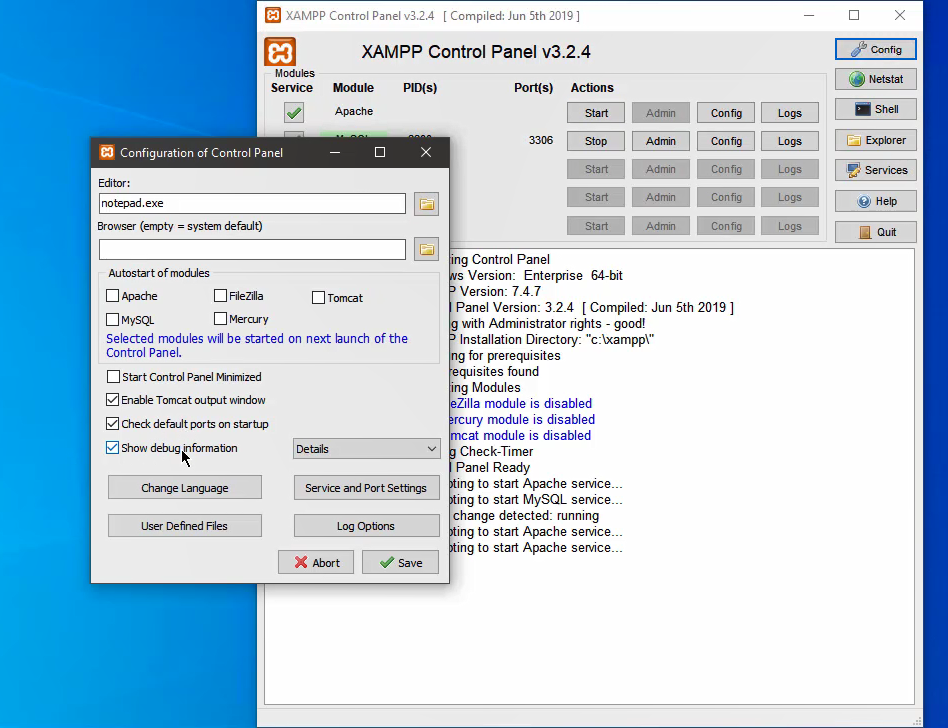
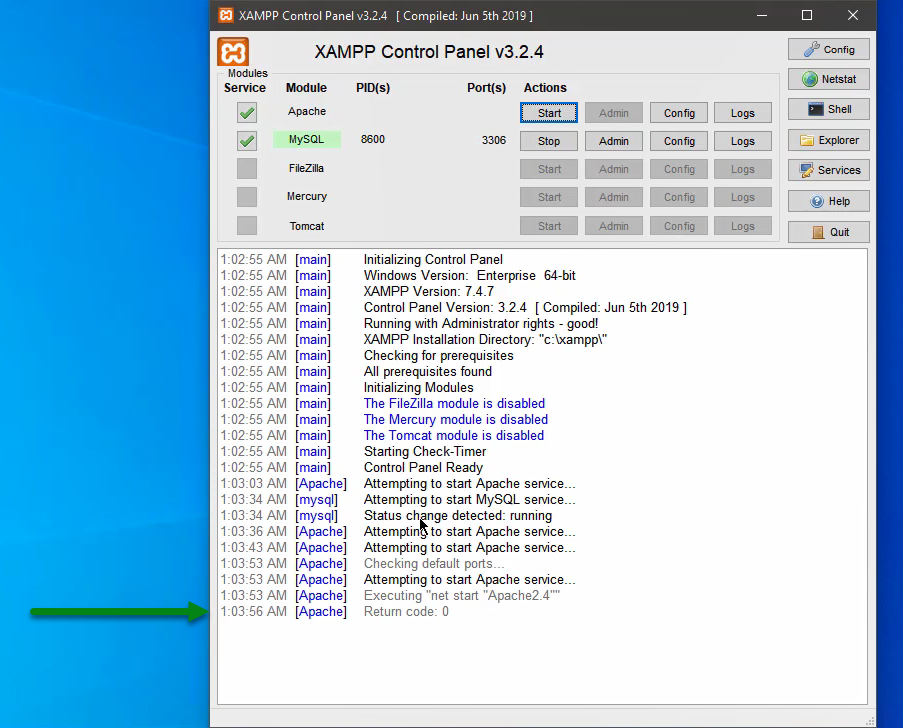
- If something goes wrong, in the debug information we will see return code: 0
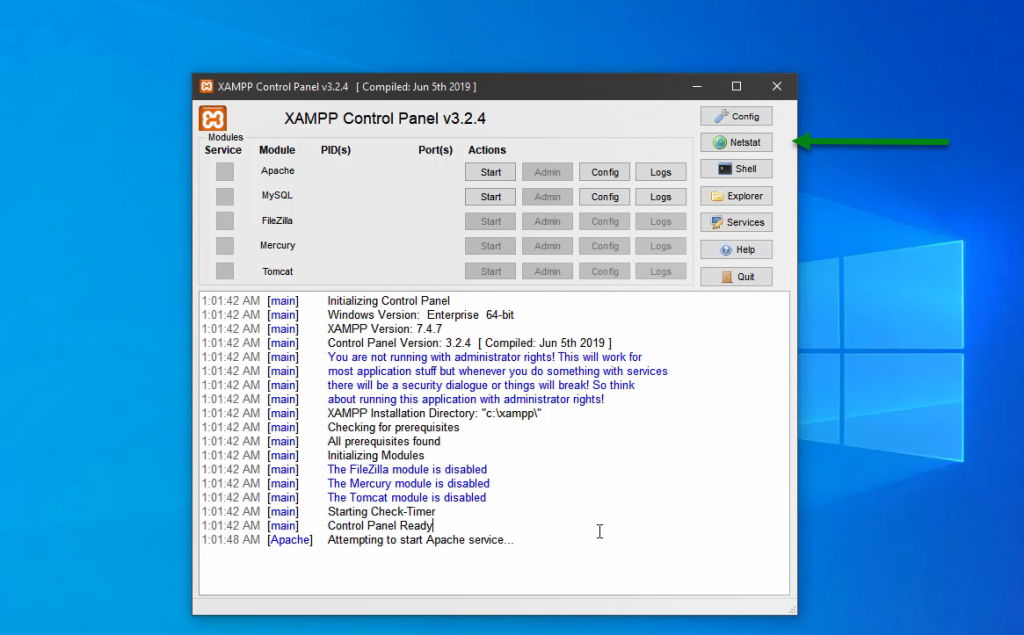
- Goto the Netstat which will show at the right side in the XAMPP control panel
- Check whether there is any porting running with 80 are not because port 80 is used as default port for HTTP.
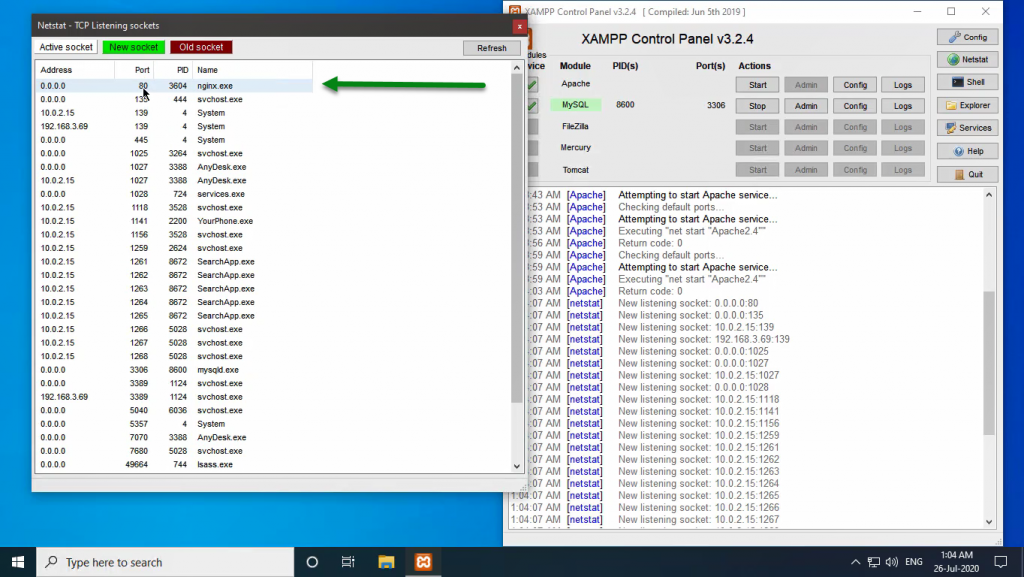 You can see that default port 80 is already using. If you want to use that port, to stop the service you can stop from services.msc or directly kill the process from the task manager or else you remain that 80 port to use by Nginx and you enable another port for XAMPP to run.
How to change default ports of apache and MySQL on XAMPP
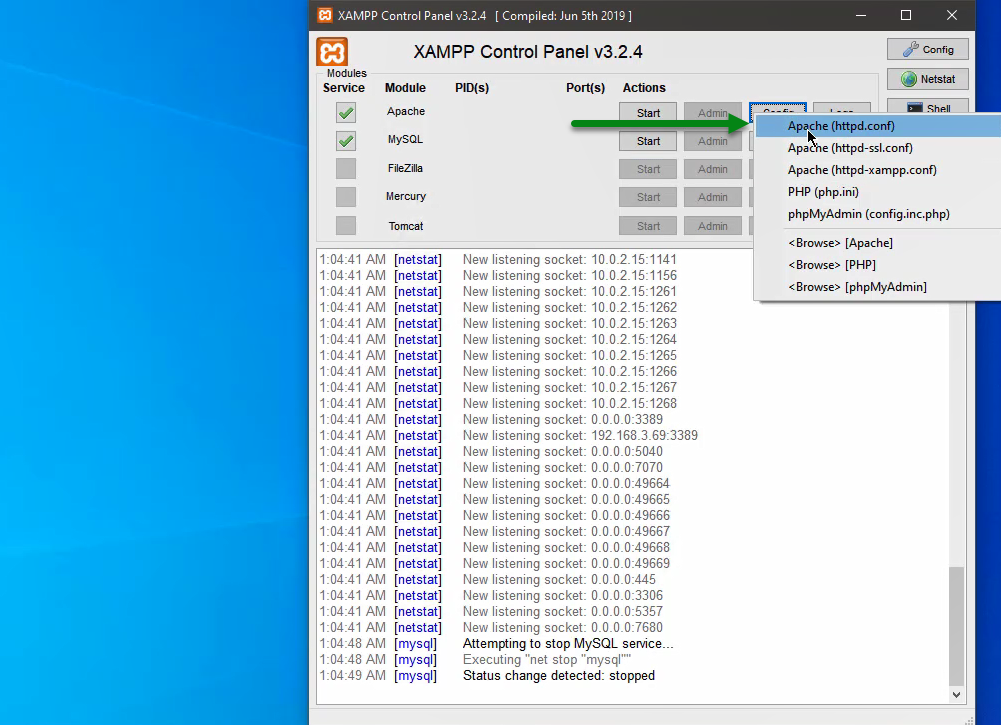
- Open XAMPP Control Panel – By using any method

- To change the Default HTTP Port (80) goto http.conf file
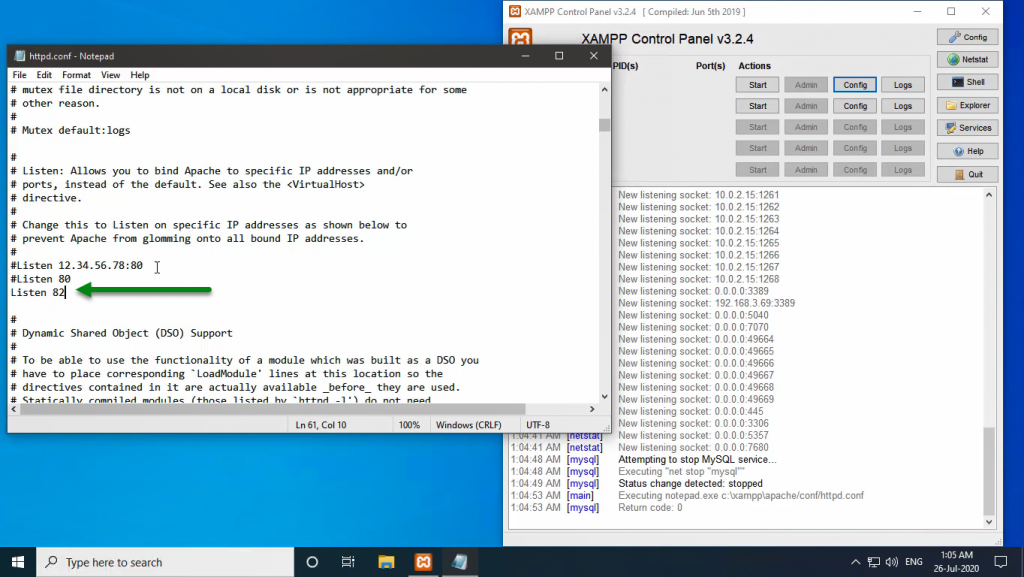
To change the Port number need to change the “Listen [port_number] – Listen 82”, save the file and restart the server to apply new ports.
we can enable multiple ports for single server.
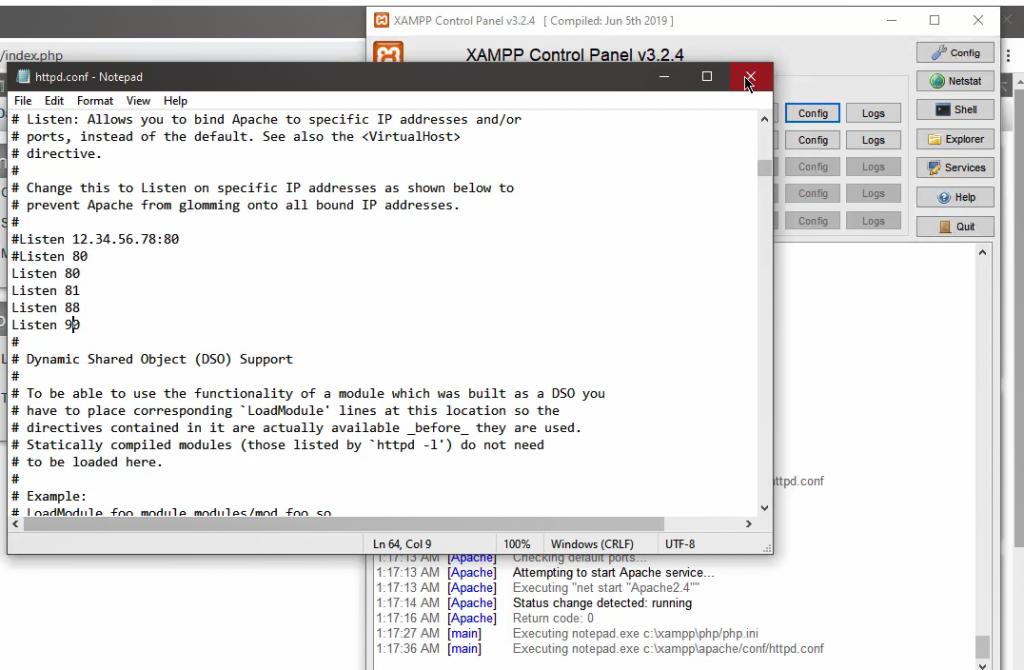
After restart we can see multiple ports are running.
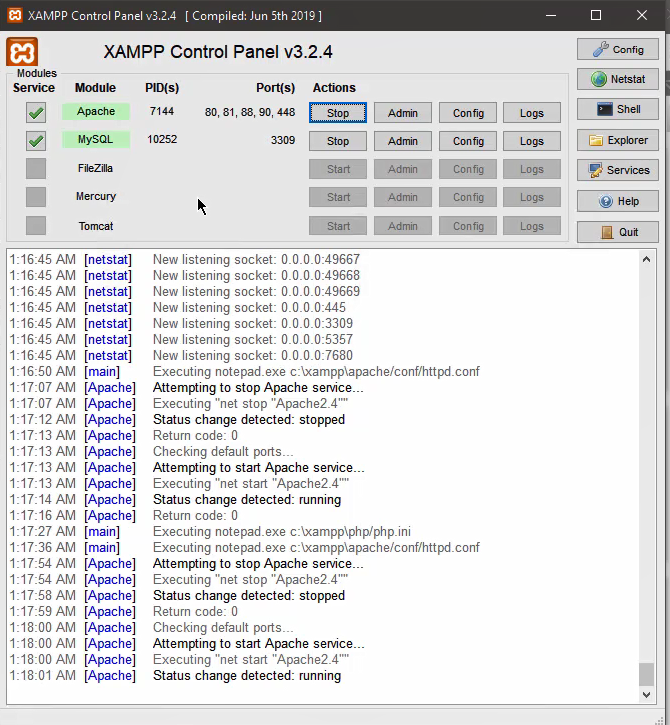
- can we change port for ssl? yes, we can chang the port number form http-ssl.conf file
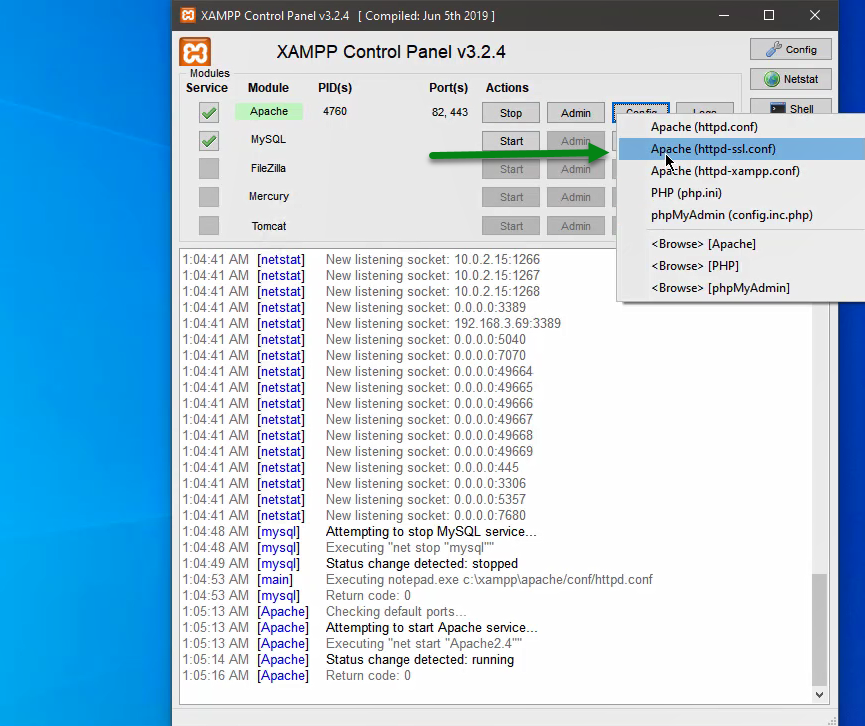
change the port number “listen [port_number] – Listen 448”,save the file and restart the server.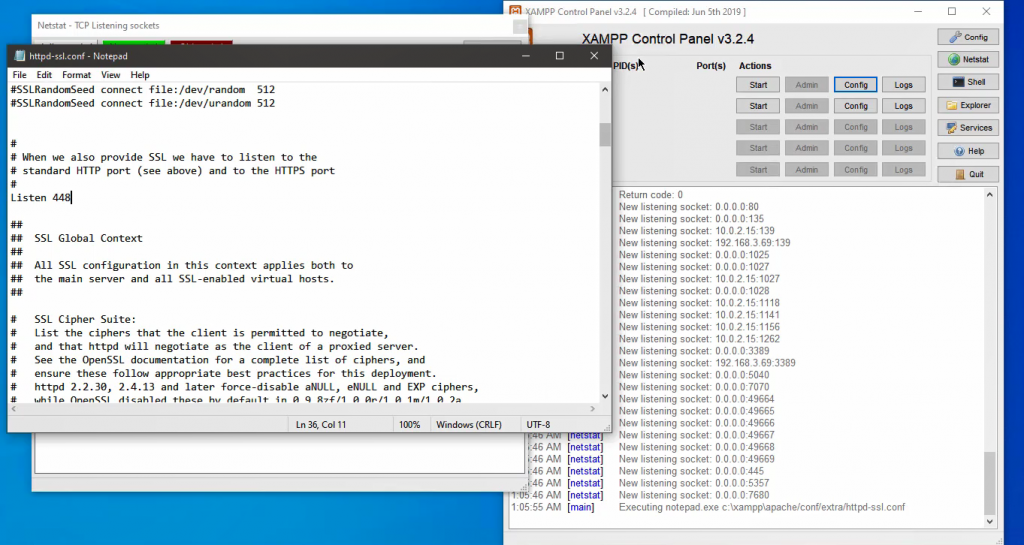
After Restarting the server, the port numbers will change.
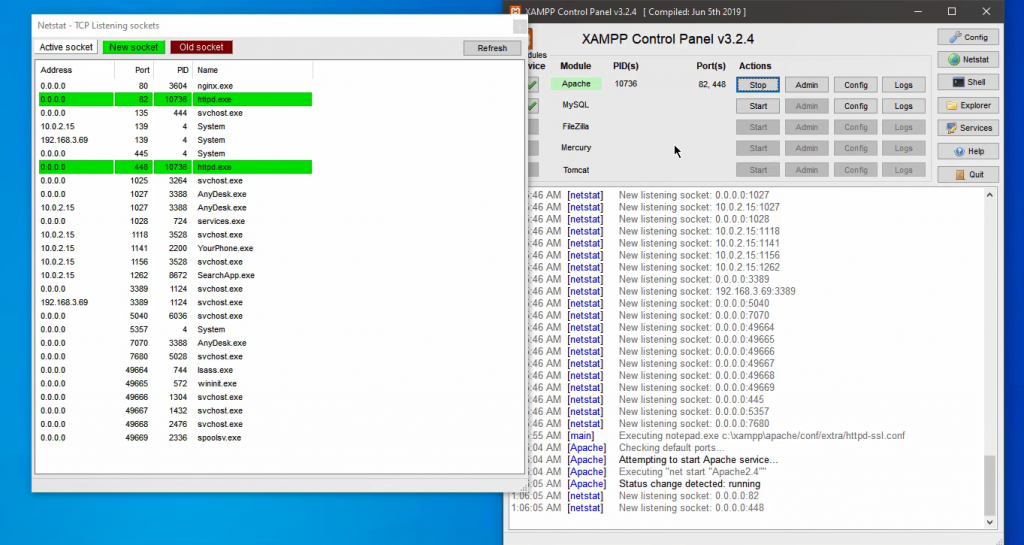
- To change the MySQL server port numbers goto my.ini file
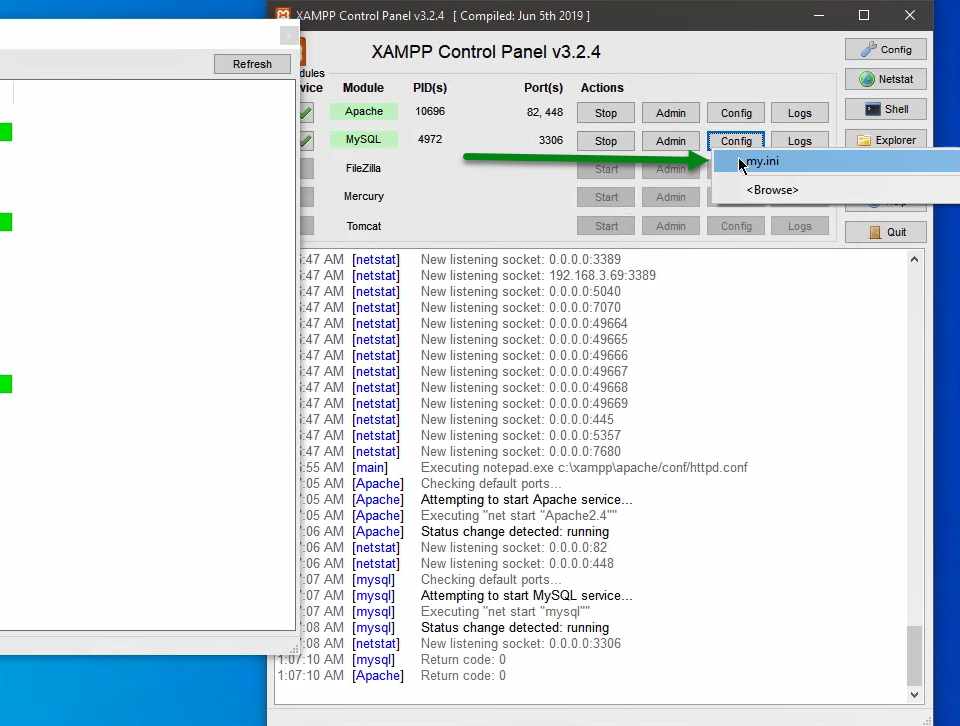
change port in “[Client] section”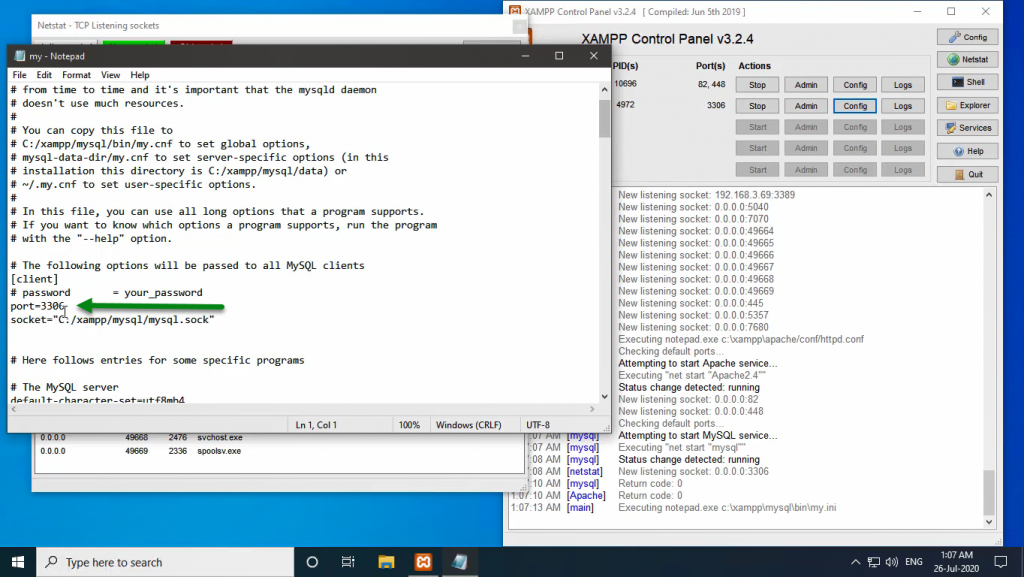
Change port numbers in client section and server sections.
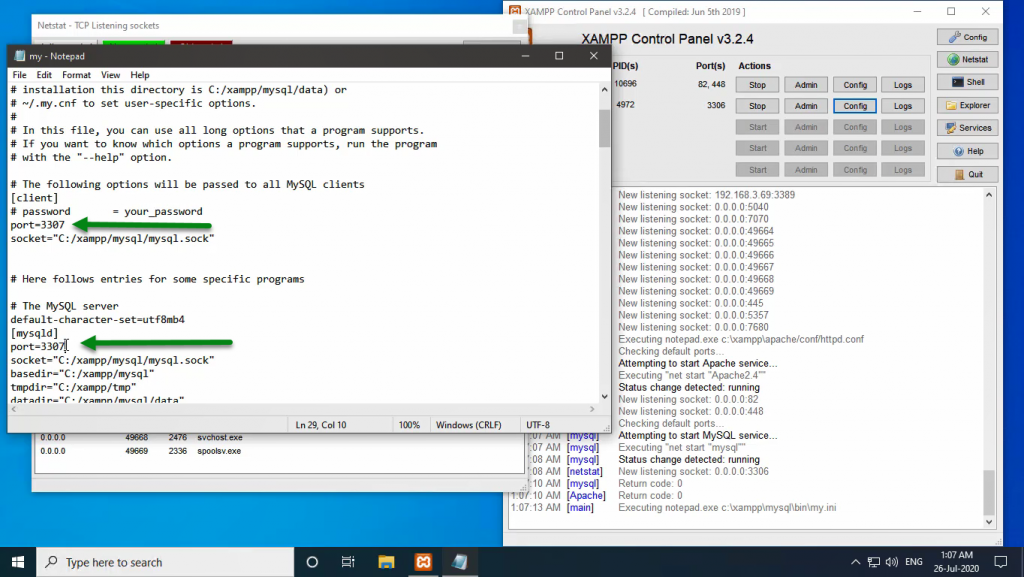
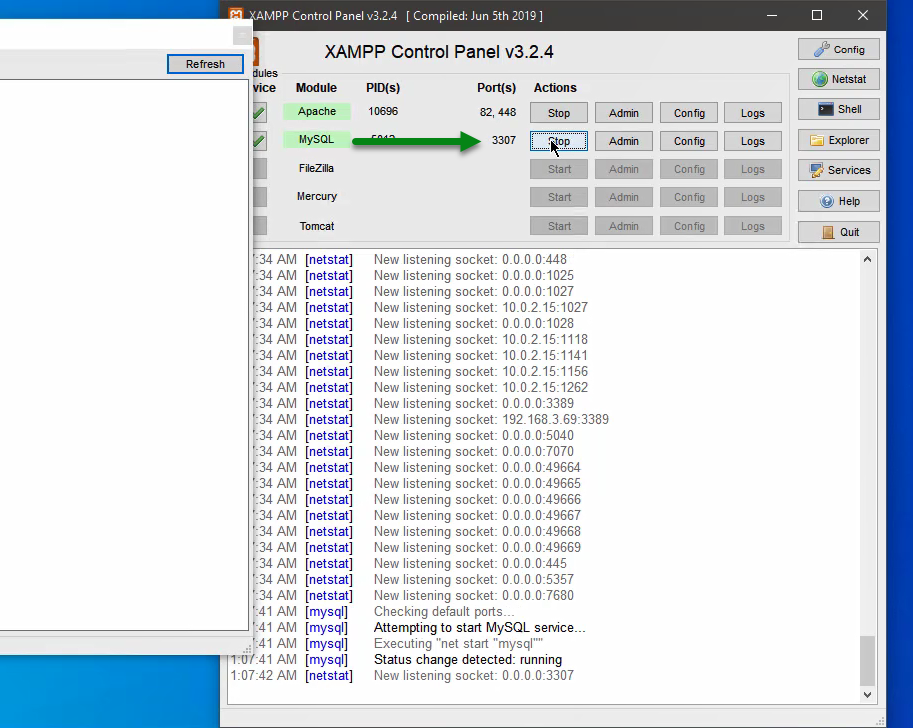
restart the server to make changes.
How to access MySQL from command line on XAMPP
- Open XAMPP Control panel using any method and Click on Shell Button
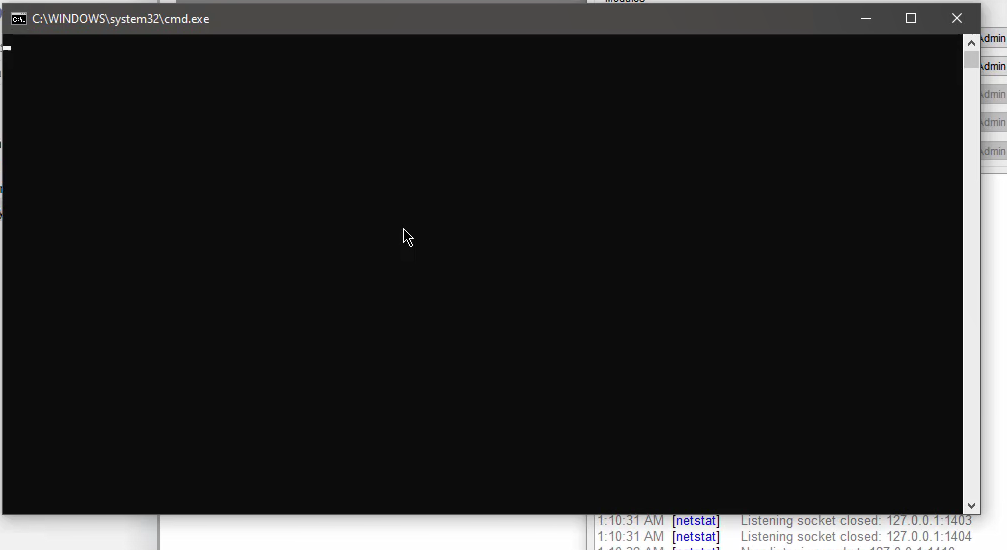
 It will open command Shell Screen.
- Then enter mysql command to use the mysql terminal.
if you are having login and password use the command “mysql -u [username] -p”
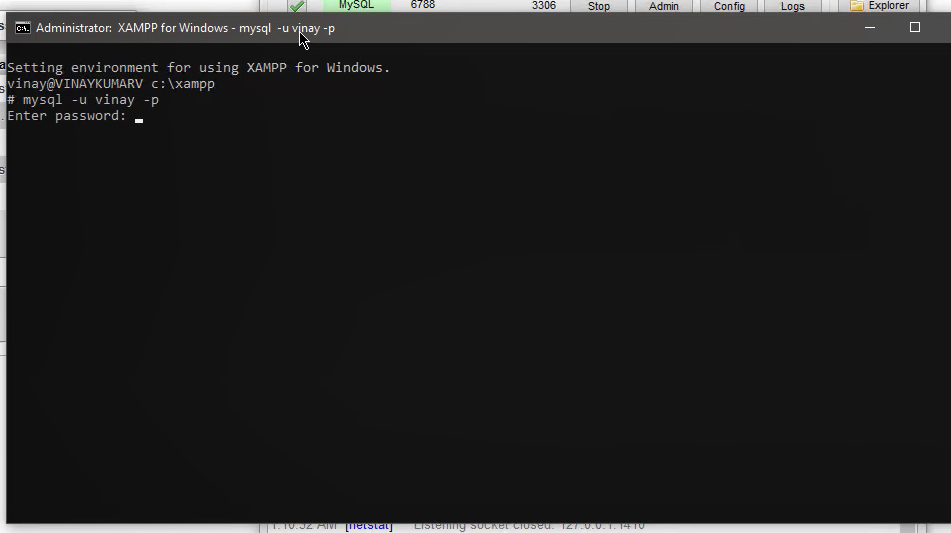 Click enter then it will ask for password in a blank screen if you have copied any password click right-click on mouse and trigger enter button.
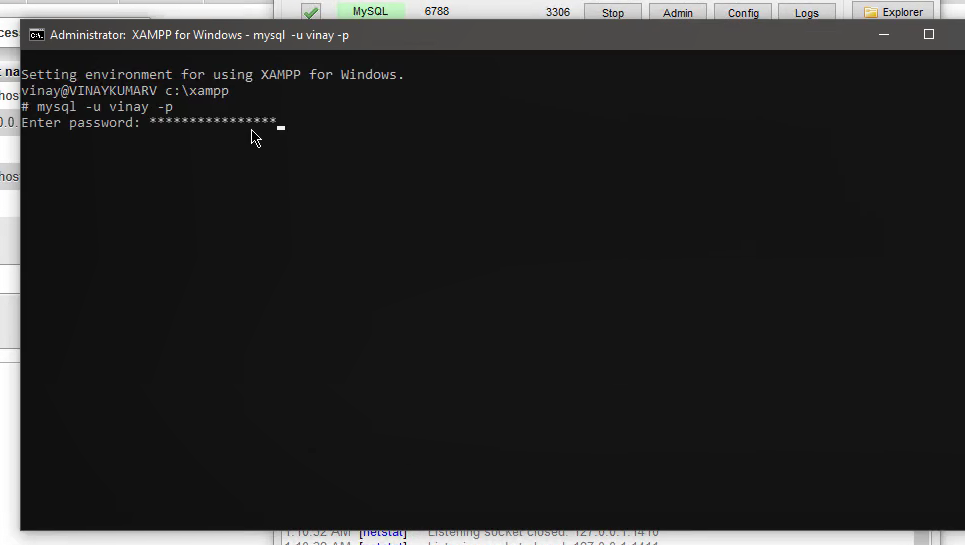
If your username and password is authenticated successfully, you will see the screen as follows.
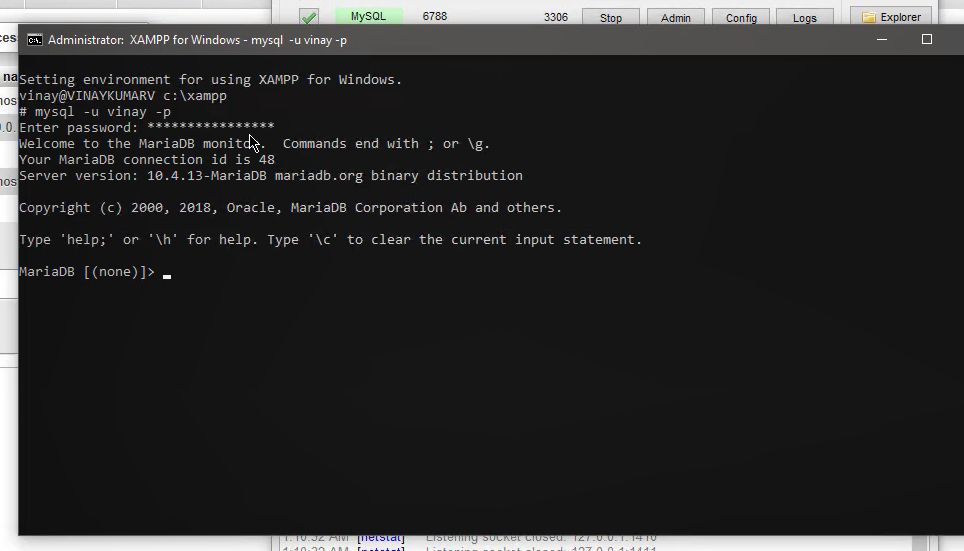 If you want to show the databases use the command “select databases”, for tables “show tables” and finally if want to exit or quit from the established connect, utilize “exit” command.
Leave a Reply
You must be logged in to post a comment.